What do ND Filters do – In Depth Guide For Beginners
What do ND filters (also known as neutral density filters) do? In this tutorial, I’m going to give you a guide to ND filters and its use in ND filter photography; what ND filters do, what ND filters to buy, what effects they create and so on. I’ve also created an ND filters guide that you can download and keep. This will help you work out shutter speed times using our exposure calculator and advise on what ones to buy. If you’re thinking of buying or using ND filter for long exposure effects, then this tutorial is for you. There is also featured below an ND filter video guide.
The Guide and Exposure Calculator can be found below.
Get access to ALL our online courses – 1000’s of videos, worksheets, critiques of student’s work, personalised support and much more with our monthly membership.
What do ND filters do?
ND filters, or neutral density filters, are essential tools in photography that reduce the amount of light entering your lens without affecting colour. This allows you to use slower shutter speeds or wider apertures in bright conditions—something that would otherwise lead to overexposed images.
In practical terms, ND filters let you create effects like smooth, flowing water, motion blur in clouds, or a cinematic look in video. Whether you’re shooting landscapes, long exposures, or video, understanding how ND filters work is key to gaining full creative control over your camera settings.
They help you create images like this….

Seascape at sunset taken with an ND Filter.

Black and white seascape taken with an ND Filter.
An ND filter acts like sunglasses would to your eyes, it blocks light coming into the lens like sunglasses blocks light coming into your eyes. ND stands for Neutral Density which means it blocks the light in a neutral way without changing the colour of the light. You may occasionally see the term natural density filter, but the correct name is neutral density filter, as it refers to reducing light without affecting colour.
Why would you want to block light coming into your lens?
Light is good, right? It’s what makes the image. It makes sense to think that if you block light coming into your lens you’re just going to make a dark, underexposed image.
Well, when you block light coming into your lens you’re are forced to expose the camera to light for a longer period of time. You have to open the shutter for longer to allow for the correct amount of light to enter the camera.
Let’s look at the effect an ND filter can have on an image. Below is a normal picture with no filter, taken using a tripod at 1/30th of a second. You can see the ripples in the water and the clouds look clear, everything has been frozen for that fraction of a second. Exposure details - 1/30th sec, f22, ISO 400

1/30th second – f22 – ISO 400
And here is a shot taken just after that one using a 10 stop ND filter. The filter has allowed me to increase the exposure time to 30 seconds. I’ve still exposed the camera to same amount of light, but this one has been exposed over a longer period of time. When you do that everything that’s still, stays still, i.e. the tree and mountains and everything that moves blurs or blends together. This shot has also been adjusted in Lightroom to pump up the colours and contrast. Check out my other tutorial on how I adjust images in Lightroom if you wish. 30 Secs, f22, ISO 400

30 seconds – f22 – ISO 400
Let’s look at them both together. The one on the left, shot at 1/30th of a second, the one on the right, shot at 30 seconds with a 10 stop ND filter on. Again, they have both been exposed to exactly the same amount of light, but with the ND filter on you able to let that light in slowly which allows moving things to blur, such as the clouds, and it also allows things to blend in, such as the ripples in the water. Also note that it is only the shutter speed that has changed. The aperture and ISO stay the same when you are doing these shots and you must shoot in fully manual mode. I cover that in much more detail in my other tutorial ‘How to use ND filters’.

What do ND filters do? They come in all shapes and sizes
Screw on Type
Ones that screw onto the front of your lens, ones that need to use a filter holder system and graduated ND filters, with the graduated ND filters it’s best to use a filter holder system.
The screw in types are very good value for money (around £10 or $15 each), you can get lots of different brands of these and they all do pretty much the same thing. If you’re just starting out I recommend getting one of these types that will fit your widest-angle lens or your standard zoom lens, this will be great for getting those long exposure landscape shots.

Screw on ND Filter

77mm size filter

To fit a 77mm diameter lens
The filter holder type
Cons - A lot more expensive. This system is for a commitment to this type of photography, or for those who have the money to spare – the other is for a practice or play around.
Pros - Better quality. You can use them with other lenses but you will need an adapter ring for different lens. You can use ND filters in conjunction with other filters like the ND grad filters.

Filter adapter ring

Filter holder
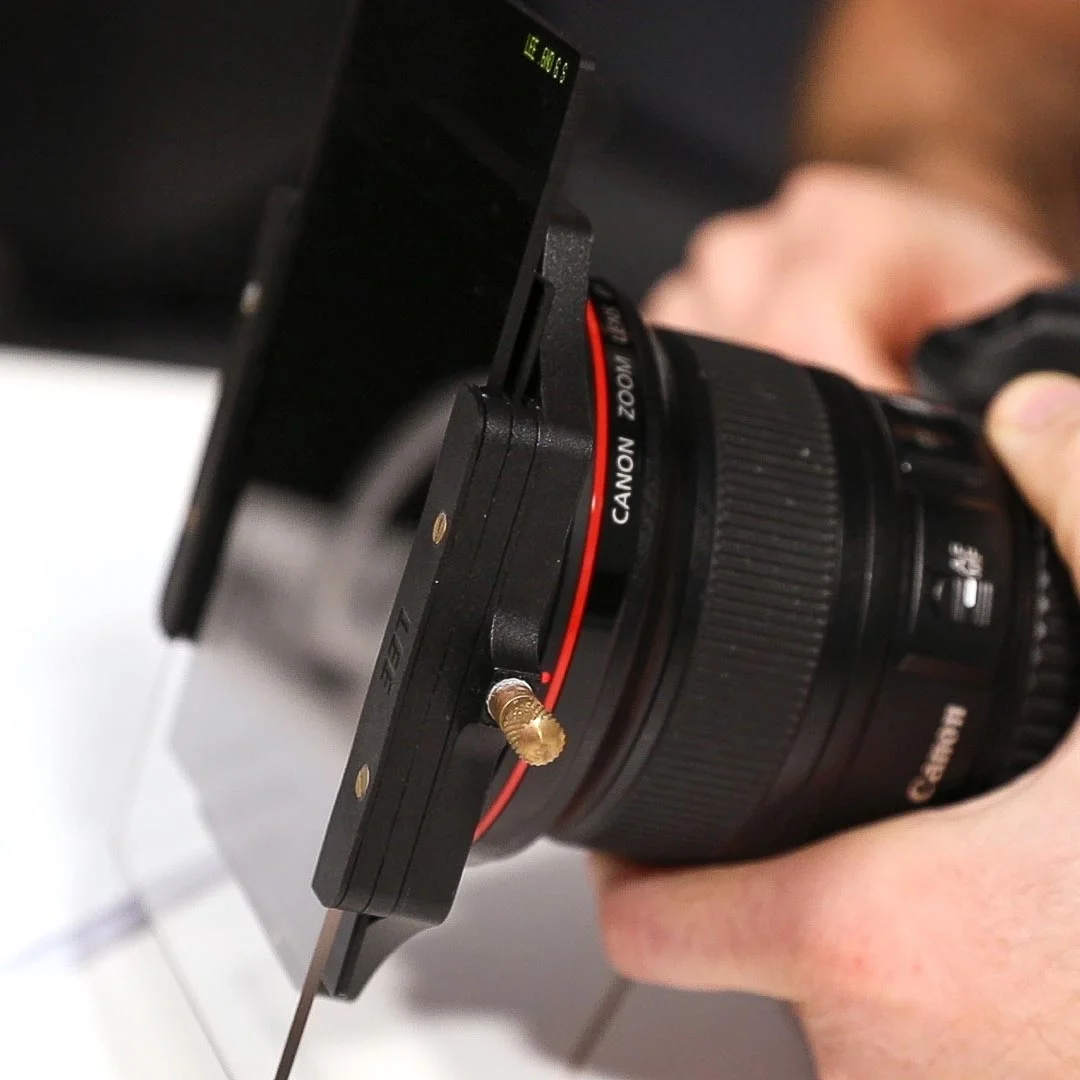
ND Filter Holder System
What do ND filters do? Brands
There are many brands and they are all pretty good. Here are some brand names - HiTech, Lee, Nisi and cokin, the latter being the more budget brand.
ND Grad filters
ND Grads are mainly used to darken down skies and balance out your exposure.
Below is an example using a hard grad ND filter. The one on the left is a normal picture shot using the camera’s built in light meter. This is what the camera thought was the correct exposure. The one on the right with the 2 stop hard grad ND filter. This has darkened the sky by 2 stops to give a much more balanced exposure.

Two images one without an ND Filter and one with an ND Filter to illustrate the difference
Then, using the filter holder system, you can add a 10 stop ND filter together with the ND hard grad, add some Lightroom and Photoshop trickery to it and you can get a shot like this.

2 stop hard grad ND filter and a 10 stop ND filter
Different strengths of ND filters / Neutral density filter
ND filters are created in stops. A stop in photography is either halving or doubling the amount of light e.g. making the picture 1 stop darker or 1 stop lighter. In the case of ND filters, you are always halving or reducing the amount of light. So a 1 stop ND filter will be stopping the light by 50% or half. A 10 stop filter is stopping the light by 10 halves in a row. You have to do it sequentially, that’s important.
Remember when you’re doing long exposure shots it’s only the shutter speed you want to be changing. If you have a 2 second exposure without a filter, then you put a 1 stop ND filter on, you have effectively halved the amount of light coming into that camera. So to counter balance this you have to increase the amount of time you let light into the camera, in this case by doubling it. See table below.

Adding a 1 stop ND will half the light
That’s the basic principle of ND filters, they stop light coming into your camera which forces you to compensate by letting in light over a longer period of time. The table below shows this with a 1 second exposure adding different strengths of ND filters. Notice how the new exposure times double sequentially. E.g when you add a 4 stop ND filter you have to double the original exposure 4 times.

Different ND filters with calculated exposure times
Different numbers for stops
Just to confuse you more, different manufacturers will advertise different numbers for stops. For instance, instead of saying a 2 stop ND filter, they might say it has an ‘optical density of 0.6’ or a ‘ND factor of 4’. To help you out with this here is another table giving you all these different numbers which mean the same thing.

Stops, Optical Density and ND Factor equivalent chart
My best advice for you is to just stick to the stops, how many stops does the ND have.
What do ND filters do? What filter is best to use?
For long exposure shots like below with clear water and blurred clouds you will want a 6 stop or 10 stop ND filter as this will give you an exposure time of at least 30 seconds and up to 4 minutes. The higher stop filters will enable you to get those long exposures.

Shot using a 10 stop ND filter
Then for shots like the one below you will want a 2 stop filter. This was shot at 1/15th of a second in the middle of the day. Because there was a lot a light I needed to stop the light down slightly so I could open my shutter for longer.

Shot using a 2 stop ND filter
Equipment you will need
A good sturdy tripod is a must. You’ll need a bit of weight so it holds your camera firmly and still for long periods of time.
You will also need a cable release or remote trigger. This is so you can use your camera on a setting called bulb. I’ll teach you all about bulb in the next tutorial when I’m out and about. You can get these quite cheaply of the internet, just type in ‘cable release for …..your camera model.
I also recommend you avoid variable ND filters. It’s harder to judge your exposure times with these types and on its strongest setting you can sometimes get lines going through the image. I would recommend getting a 10 stop and a 6 stop filter to get you started. You’ll have loads of fun with them.
There are lots of different ND filters brands and kits out there. We want to recommend to you what we think are the best whether you are on a budget or not. We have only recommended companies that we or our colleagues use.
Want to see our full range of Recommended Filters, click here.
When is best to use an ND filter?
If you want that glass looking effect in the water you need the water to be fairly still and calm, just slight ripples is perfect. Big crashing waves and rough seas will not work that well for this smooth glass effect. Also have a few clouds in the sky, this will give the shot texture. A fully overcast day will just give you a grey sky and although clear skies can look good a bit of texture up there adds to the shot. And try to catch the sunrise or sunset. Midday light will be too white and may even be too bright to get a 30 second or above exposure. Using a neutral density filtere allows you to control exposure, even in birght conditions.
And there you go, ND filters explained. Don’t forget to check out the ‘How to use ND filters tutorial’, where I’ll be out in the field using them. You can also download the free Guide to ND filters via the link above.
Frequently Asked Questions
What is better, ND filter or polariser?
Neither is better—they serve different purposes. A neutral density filter (ND filter) reduces the amount of light entering the lens, allowing for slower shutter speeds or wider apertures in bright conditions. A polarising filter, on the other hand, reduces reflections and glare while enhancing colours and contrast, especially in skies and water. Many photographers use both filters depending on the situation.
When should I use an ND filter?
You should use a neutral density filter when you want to control exposure in bright lighting while maintaining creative settings. This includes using slower shutter speeds to create motion blur (such as silky water or moving clouds) or shooting with a wide aperture for shallow depth of field in daylight. ND filters are especially useful in landscape, seascape, and long exposure photography.
Do ND filters reduce image quality?
High-quality neutral density filters have minimal impact on image quality, but cheaper filters can introduce issues like colour casts, reduced sharpness, or lens flare. Investing in a good-quality ND filter helps maintain image clarity and accurate colours, especially when shooting in challenging lighting conditions.
Like this? - Check out similar tutorials below

Long Exposure Seascapes Tutorials

Best ND Filters Tutorial
I hope you liked this video, please leave us a comment and support us by sharing it with your friends and subscribe to our newsletter at the bottom of this page for more.
We also have an excellent learning community on social media so please join us there as well.
Thanks for watching and remember – Learn more at The School of Photography.

Marc Newton