Landscape Photography Tips for Beginners
Ever seen a beautiful landscape, photographed it, and the picture looks underwhelming? Well, let’s change that now by giving you the best landscape photography tips for beginners. We have years of experience in this and know what stops beginners getting great landscape photography.
Underwhelming landscapes happens because you’ve not yet got control over the visual effects of photography and your camera. So in this tutorial, we’re giving you the best tips on how to improve landscape photos.
I think landscape photography is one of the most satisfying and enjoyable forms of photography and there’s no reason any beginner photographer can’t enjoy it as much as me. Download the free guide below and work along with me.
What is landscape photography?
A simple question, but is it one that you’ve actually thought about? Landscape photography is the art of capturing images to demonstrate the beauty of nature and the outdoors. A great landscape photograph carries the viewer through the scene and gives them a sense of being there or a sense of seeing something extraordinary.

Landscape photograph of the rolling hills in England - Camera Settings: 1/15th Second - f.16 - 16mm Focal length - ISO 100
Planning for landscape photography
Do not underestimate how much planning goes into getting a great landscape photograph. Planning for landscape photography is equal to your creativity and your technical knowledge of photography. What I mean by this is that your creativity and knowledge of photography are of course important but planning for the shot you want is equally important and the same effort should go into it.
Here’s a landscape photography tip beginners’ really need to take note of. Don’t just go out with your camera and hope for the best as you are unlikely to produce the shots you want. Research locations that you would like to go to, know when and where the sun will rise or fall, have an idea of what you want in the photograph and what type of equipment you will need to achieve this (we’ll be looking at the equipment needed for landscape photography later). Also, don’t forget to check the weather and the tide times if you are shooting a seascape.

Photographer setting up for landscape photography
If possible, make sure you have scouted the location in advance. This will give you more insight into where you might want to position yourself, what composition you might want to go for, where the light will be hitting at what time of day etc.
Do not expect to walk around with the family on holiday and get great shots. They will want to sit in a restaurant, you will want to climb a mountain, an argument will form, you will lose the argument, and you’ll end up in the restaurant watching a fantastic sunset that you never photographed! You can tell I’ve been there! 😊
Go create photography on your own or with others that want to do the same, good landscape photography rarely comes from a day out with the family.
Get access to ALL our online courses - 1000’s of videos, worksheets, critiques of members work, personalised support and much more with our monthly membership.
The best light for Landscape Photography
Arguably, the best time to photograph landscapes is during the golden hour. This is just after sunrise or just before sunset. The golden hour gives a beautiful warm tone to your shots which are created by the sun being low in the sky.

Example of golden hour landscape photography - Camera Settings: 50mm Focal Length - 1/250th Second - F 16 - ISO 100
Another popular time of the day to create landscape photography is within the blue hour. This is just before the sun comes up, or just after it goes down. This gives a lovely soft blue light with a hint of warm oranges in the background.

Landscape photograph taken during the Blue Hour - Camera Settings: 19mm Focal Length - 30 Seconds - F 16 - ISO 100
A good tip here is to try to avoid creating landscape photography in the middle of the day as this will give a harsh white light.
To learn about light and colour in photography, click here.
Exposing for Landscape Photography
Exposure in photography is the brightness or darkness of the image. This is where I see beginner landscape photographers get it wrong most of the time. You see a lovely scene, photograph it, and the sky is too bright, or the foreground is too dark. The first thing to note here is that this happens to everyone, whether you’ve got lots of experience or the best camera in the world, this will happen. And the reason for this is simple, the sky is a lot brighter than the ground. In general, it will be around 2 stops brighter.
When you look at a scene, your eye focuses on one part at a time. So if you look at the sky, you will see detail and it will be correctly exposed, if you move your eyes down to look at the ground, the same will happen, your eyes will adjust so you can see what you are looking at.
The camera doesn’t work like that. The camera is trying to see the whole landscape at once, which includes the ground and the sky. It physically cannot expose accurately for both as the sky is so much brighter than the ground. So how do you combat this?
To get a correct exposure for landscape photography you have to balance out the scene’s luminosity or brightness vs darkness. Now there a few ways to do this which I outline below:
Using graduate ND filters – This is the more traditional way and involves putting a filter in front of the lens to darken the sky without affecting the foreground. These filters come in different strengths which you can use depending on the brightness of the sky. E.g. you can use a 3 stop ND grad for a very bright sky and a 1 stop grad for a slightly bright sky. For more info on ND filters, click here.

Photographer exposing for a landscape photo by adding a grad filter
Taking two pictures and merging them together in Photoshop – This technique involves two landscape pictures, one that’s exposed correctly for the sky and one that’s exposed correctly for the ground. Then in Photoshop (or other similar programs), you layer them up with the bright sky on top and mask through the bright sky to reveal the darker sky underneath.

Exposed for the sky - Camera Settings: 16mm Focal Length - 1/30th Second - F 11 - ISO 100

Exposed for the foreground - Camera Settings: 16mm Focal Length - 1/10th Second - F 11 - ISO 100

Merged landscape photo - Camera Settings: 16mm Focal Length - 1/10th Second - F 11 - ISO 100
HDR photography - HDR (High Dynamic Range) is a way of increasing the tones and colours across an image. It is used to reproduce a greater dynamic range of luminosity than standard imaging. In other words, it gives you more range within the highlights and shadows of an image so that you can easily darken down the sky or brighten up the ground.
An HDR image is formed by merging 3 or more images of the same scene together. Each of the images must be taken in exactly the same place but at different exposures, e.g. one underexposed, one overexposed and one exposed in the middle. These pictures are then merged together to create an HDR image usually in a program called Lightroom. To learn more on how to create HDR photography, click here.

3 bracketed landscape photographs
Merged pictures showing an example of HDR landscape photography
I know these techniques don’t sound like tips for beginners but unfortunately, it is something you will have to grasp if you want to take great landscape photography.
Equipment for landscape photography
Camera
You’ll need a camera that goes into full manual mode. This will enable you to take full control over the camera settings which is needed for most landscape photography. An easy way to check if your camera has this function is to look at the top of the camera and see if it has a dial with the letter M (for manual) on it.
These are usually DSLR or good mirrorless cameras. You do not need to spend a fortune to get you started and second-hand cameras are fine. If you’re a beginner on a budget, then my tip is to get a second-hand DSLR body and spend the rest on a better lens. I still have, and use, a Canon 1200d which you can pick up second hand for around £100, with a lens. Remember it’s not what you’ve got, it’s how you use it! For proof of this, click here.

DSLR and mirrorless camera
Tripod
You will need a good sturdy tripod to take the weight of your camera. Avoid using cheap flimsy tripods as these could cause your camera to move in the wind or make your set up top-heavy. To check out our recommended tripod for beginners and other camera equipment for photography, click here.

Tripod
Remote trigger or a cable release
Landscape photography often needs longer exposure times and during longer exposures, you cannot touch the camera as you will get camera shake. To trigger the camera whilst not touching it you will need a remote trigger or a cable release that is compatible with your camera. A simple google search will find the one you need!

Remote trigger or a cable release
Lenses
A standard zoom lens is fine to get beginners started in landscape photography. I also think it’s a good idea to get what’s called an ultra-wide-angle lens. This is a lens with a focal length of around 16mm (full-frame), 11mm (crop sensor), 8mm (micro 4:3). To simplify this, it’s a lens that goes really wide! It creates that stretch out scene of landscapes that seem to go on for miles.

Landscape photo taken with an ultra wide lens - Forth Rail Bridge - Camera Settings: 16mm Focal Length - 62 Seconds - F 22 - ISO 100
Lot’s of pro landscape photographers will have what’s called the ‘Holy Trinity of Lenses’. These are 3 lenses that give you a focal range of around 16mm to 200mm (full-frame equivalent). That’s great for a pro but those lenses cost a fortune so my tip for beginner landscape photographers is to start with your standard kit lens and invest in an ultra-wide-angle lens if you can. Most pro landscape photographers won’t leave home without one!
For more info on lenses and focal lenses, click here.
Camera Settings for Landscape Photography
So, what camera settings do you need for landscape photography? You probably won’t be surprised to know that there isn’t a one size fits all approach to camera settings. The fact is, it’s the lighting you have available and the way you want to capture the scene that will dictate the exact camera settings. However, there are some general settings that are used for 90% of all landscape photography and these are:
A small aperture such as f16 – This will help keep the whole scene sharp from the foreground to the background.
A low ISO such as 100 or 200 – This will reduce noise in the image and keep the detail crisp and the colours vivid.
Shutter speeds in landscape photography is the most likely element to change the most. Most of the time you will be using a tripod so you can use longer shutters speeds in this type of photography. As long as the scene and your camera stay still, your picture will be sharp!
Unless the main part of your image is extremely near the foreground you will be focusing into infinity for most landscape photography. Focusing into infinity together with a small aperture ensures your photo is sharp from the foreground to the background.
To learn all about camera settings, click here.
Add Foreground Interest
A great landscape photography tip is to add some foreground interest. Some beginners think that a big patch of grass or water constitutes as foreground interest. It’s much more effective if you have something more substantial in the foreground. This could be rocks, trees, a flower etc. Try and look for objects in your scene that you can add to the foreground of your photo as this will help bring the whole scene together.

Black and white landscape photo in Loch Lomond - Camera Settings: 22mm Focal Length - 120 Seconds - f 22 - ISO 100
Use Leading Lines for landscape photos
A real skill with landscape photography is trying to make the viewers eye move through the scene effortlessly. Adding leading lines really helps here. Leading lines are some form of visual interest in the foreground that leads the viewer into the image. You can use roads, rivers, bridges, logs or anything else that might provide a path into the picture and help the eye move through the frame.

Leading lines example in Loch Lomond - Camera Settings: 17mm Focal Length - 70 Seconds - F 22 - ISO 400
Capture movement
Another great landscape photography tip is to capture movement within your scene. This can be water flowing over rocks, a running waterfall, clouds moving in the sky etc. It really helps in adding drama to your scene and can make the ordinary, extraordinary.
For this effect, you will need to use longer shutter speeds and possibly ND filters. This may not be possible for beginners in landscape photography but it’s something you can aspire to and learn over time.

Water flowing over rocks showing movement in landscape photography - Camera Settings: 25mm Focal Length - 1/2 Second - F 22 - ISO 100
The Rule of Thirds
The most popular rule of composition and another great tip is to use the rule of thirds. In the rule of thirds, an image is split into three equal blocks vertically and horizontally and together they form a three-by-three grid. You should aim to get the most interesting parts of your image near the corners of these segments, where the imaginary gridlines meet. Using the rule of thirds gives a more natural feeling to the image and allows the eye to flow around the picture with ease.
If your camera can overlay a grid, turn on the feature and use it to help compose your pictures.

Landscape photograph showing the rule of thirds - Camera Settings: 70 Seconds - f 22 - 16mm Focal length - ISO 100
Symmetry
In contrast to the rule of thirds, placing things symmetrical in your frame will give a clean and clinical feeling.

Mountains showing symmetry in water - Camera Settings: 1/400th Second - f11 - 28mm Focal length - ISO 200
Minimalism
Minimalist photography is a form of photography that is distinguished by extreme simplicity. It focuses solely on the smallest number of objects and it is normally composed in a clean, clinical way with very little differences in the colours and tones of the image. Sometimes with landscape photography, it’s more about what you exclude rather than include. At times try to keep the composition simple and if you can.

Minimalist landscape photo of a lighthouse out at sea - Camera Settings: 120 Seconds - f 16 - 65mm Focal length - ISO 100
Practice, evaluate, learn and make sure you have fun!
Finally, and probably the best tip for beginner landscape photographers is to practice and have fun! It’s all digital these days so take as many photos as you want then evaluate them for any improvements. Work out what you are doing right and what you’re doing wrong and of course, don’t forget you can clear up confusion and learn photography a lot quicker with our range online courses click here to find out more.
Examples of landscape photography

Landscape photography during sunset at the beach - Camera Settings: 18mm Focal length - 17 Seconds - f 11 - ISO 200

Landscape photo during golden hour in Tenerife - Camera Settings: 17mm Focal length - 1/6th Second - f 11 - ISO 100

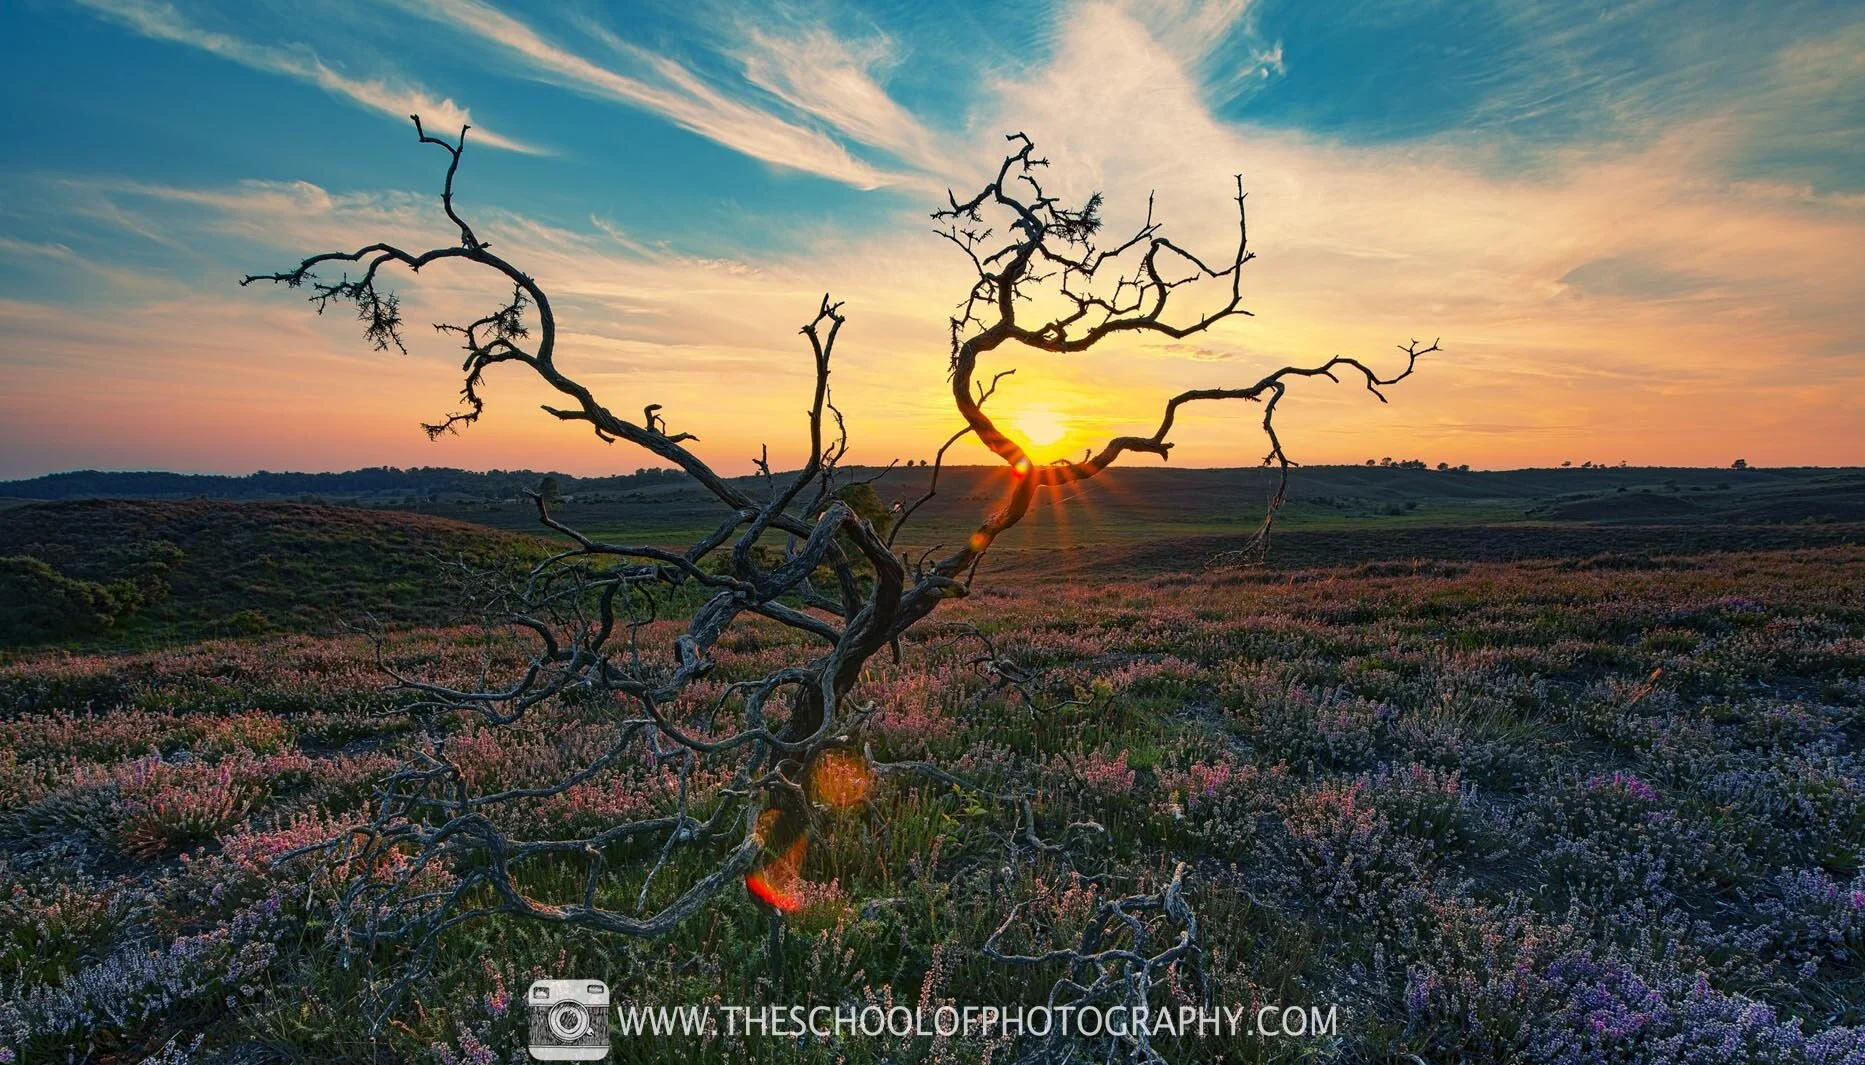
A landscape photo during golden hour in the New Forest, England - Camera Settings: 16mm Focal length - 1/25th Second - f 16 - ISO 100
Like this? - Check out similar tutorials below


I hope you liked this blog, please leave us a comment and support us by sharing it with your friends and subscribe to our newsletter at the bottom of this page for more.
We also have an excellent learning community on social media so please join us there as well.
Thanks for watching and remember – Learn more at The School of Photography.
