Photograph the Moon – A Complete Moon Photography Guide
In this step-by-step guide, you’ll learn how to photograph the moon in stunning detail. We’ll walk you through the best camera settings, essential equipment, and proven techniques to capture sharp, well-exposed moon photos—whether you’re a beginner or refining your skills.
By the end of this tutorial, you’ll know exactly how to photograph the moon pin-sharp in any phase, from a bright full moon to a delicate crescent, as well as how to create more dramatic images using foreground elements. You’ll also get access to a downloadable moon photography guide, so you can take these tips with you when you head out to do photography of the moon.
You may also want to learn more about night photography fundamentals.
Get access to ALL our online courses – 1000’s of videos, worksheets, critiques of student’s work, personalised support and much more with our monthly membership.
What You’ll Learn: Moon Photography Basics
Photographing the moon can be challenging, especially if you’re unsure what camera settings or equipment to use. When people first try to photograph the moon, they usually encounter two common problems:
Blurry images caused by camera shake
Overexposed moon photos that lack detail
Understanding why these issues occur is the first step to fixing them and improving your moon photography results.
If you want to learn more about photographing the moon and night sky photography, check out our Astrophotography course with Ben Bush.

An overexposed full moon photographed at 800mm. Incorrect exposure settings can cause the moon to appear as a bright white disc with no surface detail—one of the most common mistakes when learning how to photograph the moon.
1/5 Sec, F/11, ISO 160, Focal Length 800mm

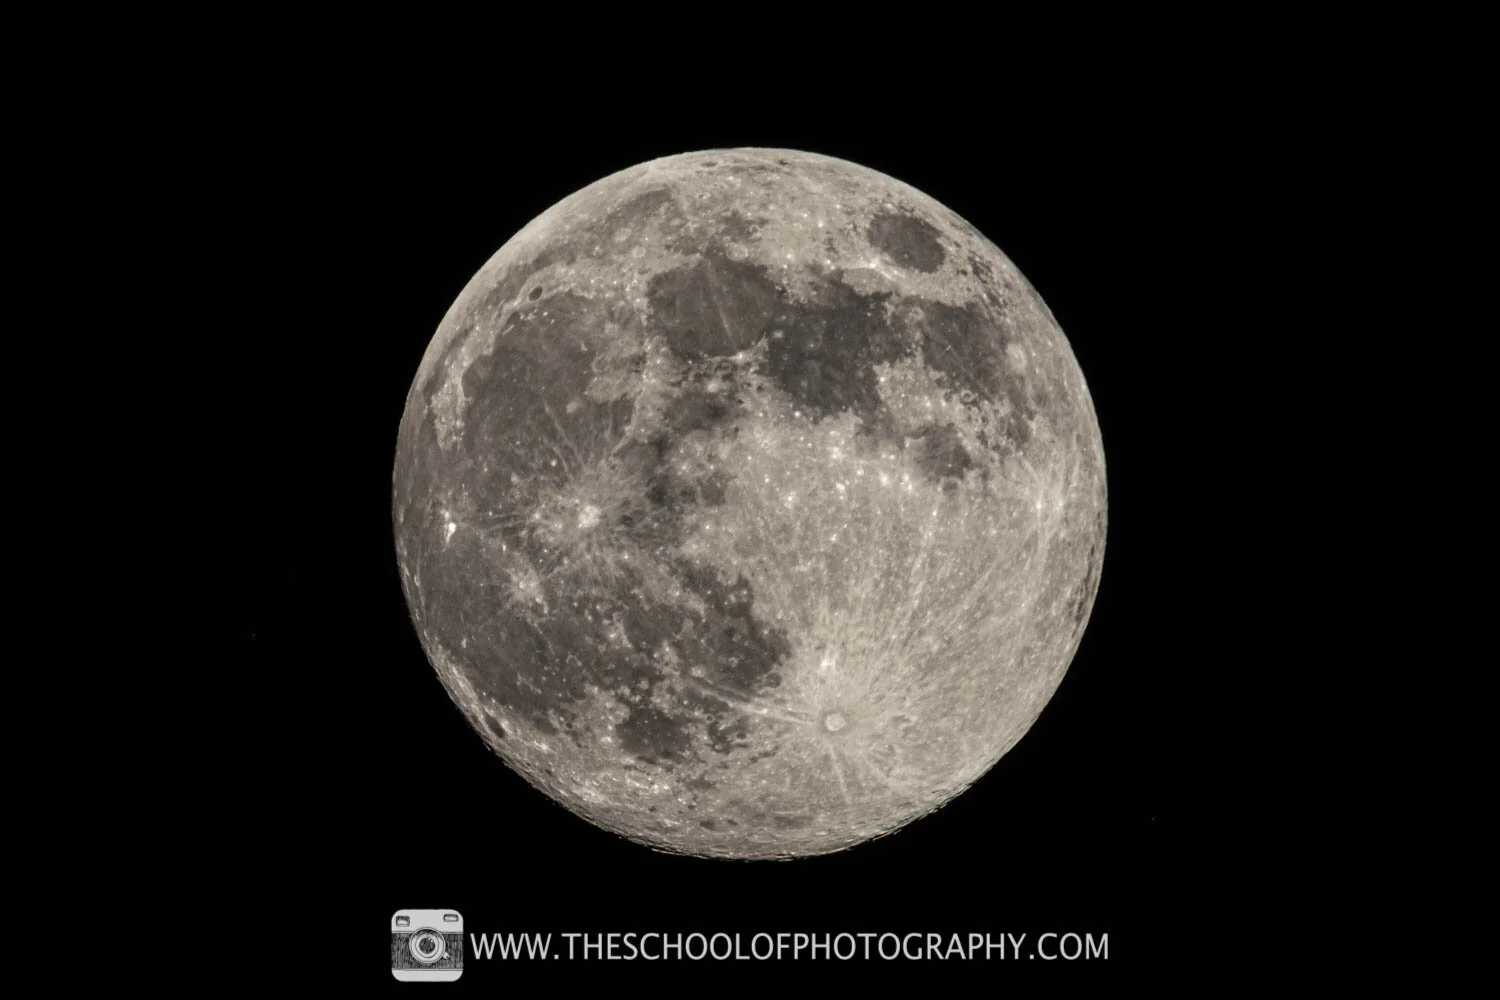
A sharply focused close-up of the moon captured at 800mm using correct exposure settings. Slower shutter speed and lower ISO preserve crater detail and surface texture—key techniques when learning how to photograph the moon.
1/60 Sec, F/11, ISO 80, Focal Length 800mm
Best Locations to Photograph the Moon
When choosing where to photograph the moon, darker locations are always better. Light pollution from towns and cities can reduce clarity and contrast, making moon photography more difficult.
For best results:
Shoot away from built-up areas
Scout your location in advance
Choose an elevated vantage point where possible
Also consider how the moon will move across the sky. If it passes through areas affected by light pollution, this may impact the final image.
Best Times to Photograph the Moon
The best time to photograph the moon is when the sky is clear. One of the great things about moon photography is that the moon looks impressive throughout all stages of the lunar cycle.
Whether you’re photographing:
A full moon
A waxing or waning crescent
A half moon
You can still achieve excellent results.
How to Photograph the Moon During Special Lunar Events
To experiment creatively when you photograph the moon, plan shoots around special astronomical events such as:
Supermoons
Blood moons
Lunar eclipses
These events are time- and location-specific, so research and planning are essential.
How to Photograph the Moon at Moonrise and Moonset
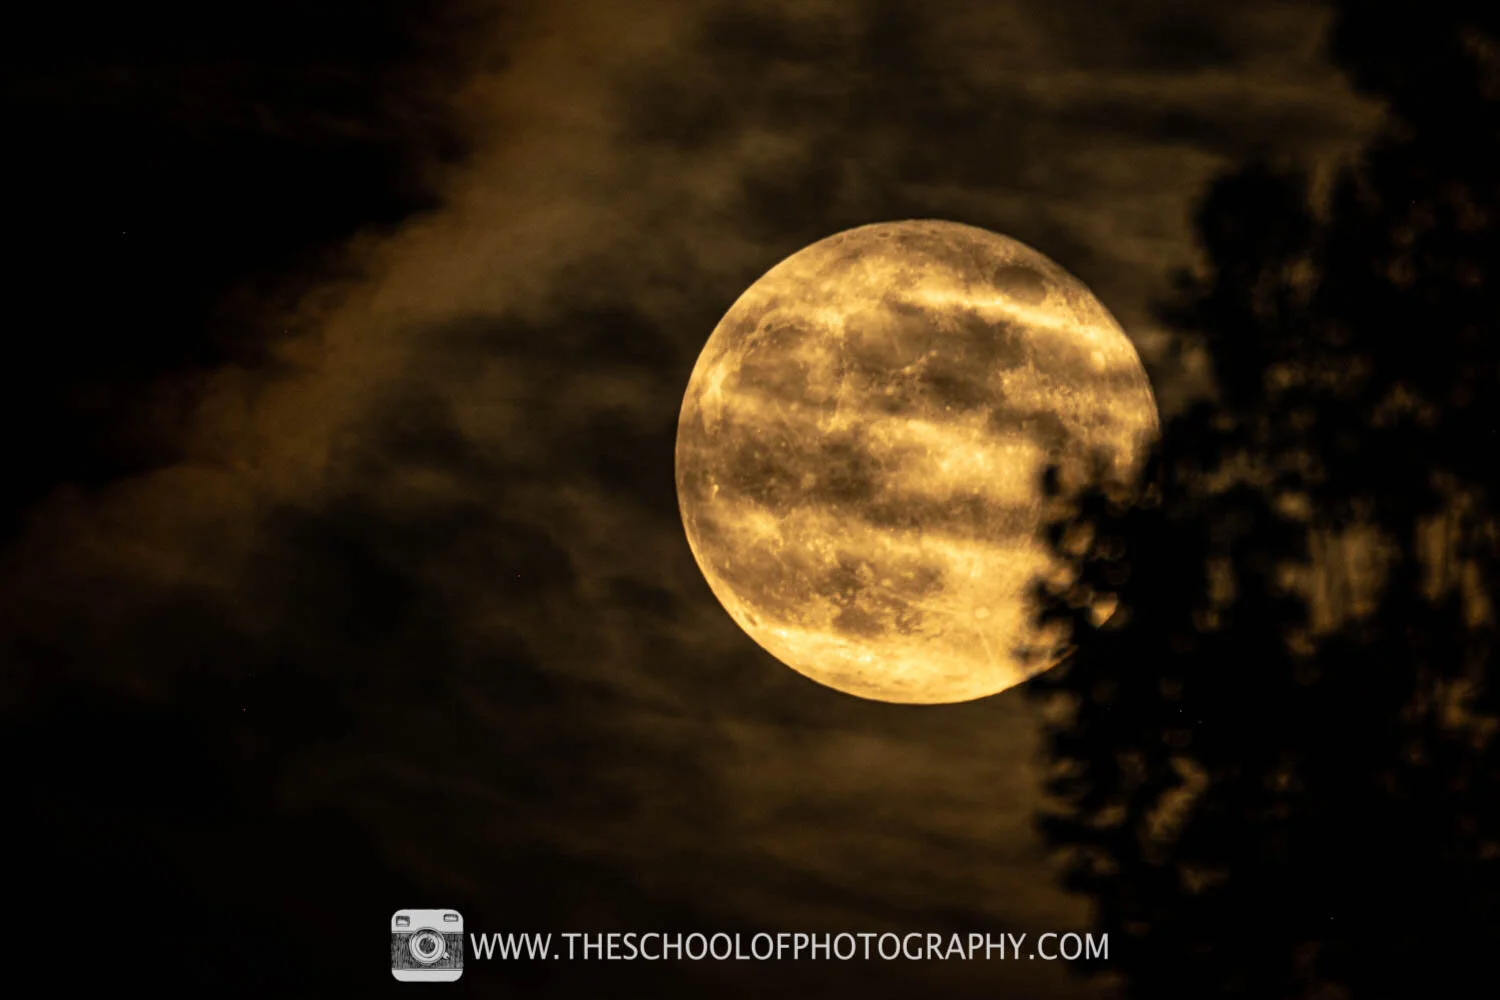
Another excellent opportunity to photograph the moon is during moonrise or moonset. These times often produce warmer tones and allow you to include foreground interest, though you may need to adjust exposure settings due to changing light levels.
In our example, the image was taken two days before a full moon, when the moon still appears large and detailed.

A composite image showing the moon through multiple lunar phases. Understanding and planning around the moon’s phases is essential when learning how to photograph the moon, as different phases reveal different levels of surface detail and contrast.
Best Equipment for Photographing the Moon

A mirrorless camera fitted with a long telephoto lens and mounted on a sturdy tripod. Using a stable setup and sufficient focal length is essential when learning how to photograph the moon and capture fine surface detail.

A mirrorless camera paired with a super-telephoto lens and securely mounted on a tripod. Long focal lengths and a stable setup are essential when learning how to photograph the moon, especially for capturing fine lunar detail.
Best Cameras for Moon Photography
To photograph the moon properly, you’ll need more than a mobile phone. A DSLR or mirrorless camera with manual settings is essential.
The camera doesn’t need to be the latest or most expensive model — the key requirement is full manual control and interchangeable lenses. To learn more about cameras for manual photography, click here.
And if you are a beginner you might want to learn more about the right camera equipment.

A mirrorless camera mounted on a tripod and fitted with a long telephoto lens, ready for moon photography. A stable tripod and sufficient focal length are key when learning how to photograph the moon sharply and in detail.
Choosing the Right Lens to Photograph the Moon
When you photograph the moon, focal length is critical. A telephoto lens is required to capture detail, as the moon is much smaller in the frame than it appears to the eye.
Minimum recommended focal lengths:
Micro 4/3: 300mm
APS-C (Crop Sensor): 400mm
Full Frame: 600mm
Telephoto lenses are commonly used for wildlife and sports photography and are ideal for lunar photography.
To learn more about camera sensor sizes, click here. To learn about Focal Lengths in photography, click here.

A Fujifilm 2× teleconverter mounted between the camera and a 100–400mm lens. Teleconverters can extend focal length for moon photography, helping fill the frame, but they also reduce light and require careful exposure settings.
Using a Teleconverter for Moon Photography (Optional)
A teleconverter is a cost-effective way to increase focal length when you photograph the moon.
For example:
A 400mm lens with a 2× teleconverter becomes an 800mm lens
Be aware that teleconverters can slightly reduce image quality and effective aperture, but they are far more affordable than ultra-long lenses. With careful shooting and post-processing in Lightroom or Photoshop, these drawbacks can be minimised. Photoshop or Lightroom.

A sturdy tripod is essential for moon photography. Using a solid support helps eliminate camera shake when working with long focal lengths, making it much easier to photograph the moon sharply and with fine detail.
Using a Tripod to Photograph the Moon
A strong, stable tripod is essential when you photograph the moon. Telephoto lenses are heavy, and any movement will result in blur.
Avoid lightweight or flimsy tripods, as they won’t provide the stability required for sharp moon images.

A remote shutter release and intervalometer help minimise camera shake when using long focal lengths. Using a remote trigger is a simple but effective way to photograph the moon sharply, especially when shooting with a tripod.
Cable Release or Remote Trigger (Optional)
At long focal lengths, even the smallest movement can cause blur. Using a cable release or remote trigger allows you to photograph the moon without touching the camera.
If you don’t have one, use your camera’s 10-second timer to allow vibrations to settle before the exposure.
Best Camera Settings to Photograph the Moon
Below are two reliable ways to photograph the moon: one using modern camera features and one using full manual control.
Camera Settings Option 1 – Touch Screen Shooting Mode
Set the camera to Aperture Priority
Aperture: f/11
ISO: 100 (or closest available)
Metering mode: Spot metering
Enable 10-second timer
Enable Touch Screen Shooting
Frame the shot, tap the moon on the screen to focus and meter, and let the camera take the shot after the delay.
A sharply detailed full moon photographed at 800mm using balanced exposure settings. Correct shutter speed, aperture, and ISO preserve lunar surface detail and texture—key principles when learning how to photograph the moon.
1/210 Sec, F/11, ISO 160, Focal Length 800mm

A detailed full moon photographed at 800mm using balanced exposure settings. A slightly faster shutter speed helps maintain sharpness while preserving surface detail—an important technique when learning how to photograph the moon.
1/125 Sec, F/11, ISO 160, Focal Length 800mm
Camera Settings Option 2 – Manual Mode (Works on Any Camera)
Mode: Manual
Aperture: f/11
ISO: 100
Shutter speed: 1/125 sec
Use a 10-second timer or cable release
Take the shot and review exposure. Adjust shutter speed slightly if needed.
Creative Ways to Photograph the Moon
Once you’re comfortable with the basics, you can get creative when you photograph the moon by:
Including trees, buildings, or landscapes as foreground interest
Shooting through clouds for atmosphere
Experimenting with filters and compositions
Clouds can add mood to moon photography, but patience is essential as the moon may disappear intermittently.
Don’t forget to download our guide to photographing the moon to help you while your out taking photos of the moon. You can get this at the top of this page.
A full moon photographed through moving clouds with silhouetted tree branches adding foreground interest. Slower shutter speeds and creative composition can add mood and atmosphere when learning how to photograph the moon beyond simple detail shots.
0.5 Sec, F/11, ISO 160, Focal Length 719mm

A full moon partially hidden behind silhouetted leaves and branches. Using foreground elements like trees adds depth, scale, and atmosphere—an effective creative approach when learning how to photograph the moon.
1/125 Sec, F/11, ISO 400, Focal Length 800mm
Learn to Photograph the Moon with Confidence
Photographing the moon is much easier than most people expect. By using the recommended camera settings, equipment, and techniques, you’ll be able to photograph the moon with sharp detail and accurate exposure.
Use this guide as a starting point, then experiment by adjusting shutter speed to fine-tune brightness for different lunar phases.
To learn more about using your camera in manual, click here.
FAQs
Best cameras for moon photography?
The best camera for moon photography is a DSLR or mirrorless camera with a telephoto zoom lens. This will give you very good clarity, as it has much larger sensor sizes than a phone. And the telephoto lens will enable you to zoom in on the moon again to get more clarity.
What camera settings are ideal for capturing a full moon?
Typical camera settings for moon photography are:
f/11,
ISO 100,
Shutter speed 1/125th second
Single‑point focus mode set to the centre of the frame
Which type of lens is best for detailed moon shots?
The types of lenses recommended for moon photography would be a telephoto zoom lens with the maximum focal length possible. Use a focal length of 200mm or above to achieve optimum results.
How to set up my DSLR for moon photography
To set up your camera for moon photography, you will need to put it into fully manual mode. Then you will do an exposure reading, and add the required settings into your camera.
Where can I find online tutorials for processing lunar images?
You can find detailed online tutorials for processing lunar images in our astrophotography course.
What are essential accessories for moon photography setup?
The essential accessories for moon photography are a tripod and a cable release, or a remote trigger. Using these two essential accessories will ensure that your camera stays dead still during the exposure.
Like this? - Check out similar tutorials below


I hope you liked this video, please leave us a comment and support us by sharing it with your friends and subscribe to our newsletter at the bottom of this page for more.
We also have an excellent learning community on social media so please join us there as well.
Thanks for watching and remember – Learn more at The School of Photography.