DNG vs RAW – What, Why, and should you convert?
Not sure whether to convert Raw files to DNG? Or whether you’ve done the right thing over the years, keeping your files in your native camera raw format? Well let’s answer those questions now and tell you the differences, pros and cons between using DNG’s over your camera native Raw file.
What are camera raw files?
A Raw file is an image file that is captured via your camera’s light sensor. A Raw file preserves most of the information from the camera, it doesn’t process it or compress it. It’s the digital equivalent of a negative (if you remember them), and raw files are very beneficial when it comes to post processing.

Image of a negative or an old raw file!
You can’t actually see the image from an old negative and this is the same for Raw files. A negative needs to be processed in a darkroom with an enlarger, paper and chemicals before you can see the final image.
In the same way, you can’t actually see a RAW file on a computer until you process it through a computer programme. The computer program effectively becomes what used to be the darkroom. The Raw file is just holding the information needed to produce a print, like a negative.
Different camera brands have different versions of raw files. Canon’s raw files are called CR2 or CR3, Nikon’s raw files are called NEF, Fuji calls theirs RAF and so on. Whatever they are called, they are all versions of raw files and commonly referred to as your camera’s native raw file format.

Canon CR2 Raw Files

Nikon NEF Raw Files

Fuji RAF Raw Files
Get access to ALL our online courses - 1000’s of videos, worksheets, critiques of members work, personalised support and much more with our monthly membership.
What are DNG files?
So firstly, DNG files are Raw files, they are just a different version of a raw file, just like Canon’s CR2’s are different to Nikon’s NEF’s.
DNG stands for ‘Digital Negative’ and it’s a generic raw file. Meaning this is a standard format for a Raw file and will work on all image manipulation programs that process Raw files.
A DNG is a lossless raw image format developed by Adobe and used for digital photography. It is an open-source file format meaning it’s free to use by anyone. It was launched in 2004 and all photo manipulation programs such as Adobe Photoshop and Adobe Lightroom will enable you to work with DNG’s.

DNG files are Raw files and can be edited in any image processing program
Why use Raw and DNG files?
The answer to this is quite simple. You would use raw files for post processing. If you are never going to post process an image, then there is no point taking your pictures in raw.
A raw or dng file gives you a lot more detail within the tones and colours of the image which means you can push and pull the shadows, highlights and colours a lot more. The ability to push the limits of an image is referred to as the latitude of the image.
As a comparison, jpeg files will have up to 1 1/2 stops of latitude before severe degrading of the image will occur. Whereas a raw file can have up to 3 stops of latitude before severe degrading will occur.
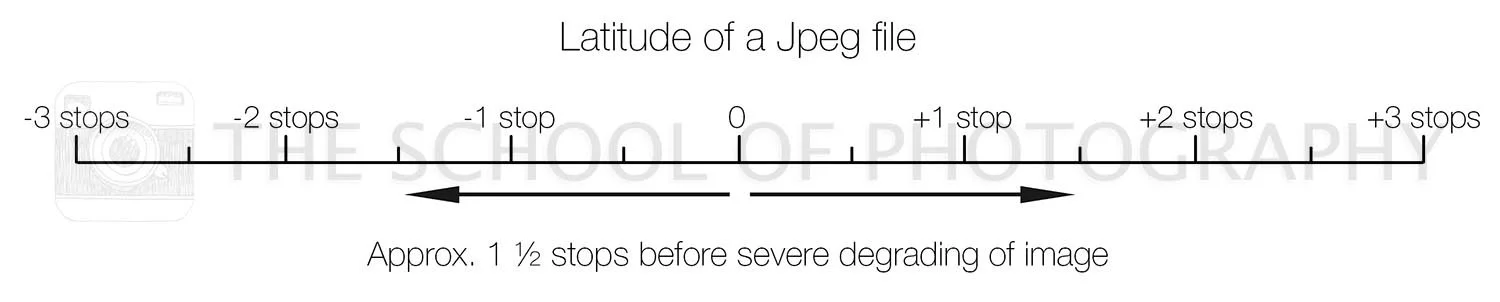
Latitude of a Jpeg file

Latitude of a Raw file
There is a trade of for this increase in latitude though, and that is the size of raw files. Raw files are approx. 3 to 5 times the size of jpegs. Meaning a jpeg file of 5MB (megabytes) would be 25MB as a raw file.

Raw vs Jpeg file sizes - A Raw file can be 3 to 5 times the size of a Jpeg
Raw vs Jpegs
Jpegs
A Jpeg file is a visible image, you can see it on screen on most computers and print it out.
It’s a compressed file. The camera takes the RAW data and compresses it into a code.
That code is then read by computers and opened into an image again.
Smaller file sizes are produced with Jpegs.
Raw Files
A RAW file preserves most of the information from the camera, it doesn’t process or compress it.
You can’t see or print a RAW file until you process it through a computer programme.
Raw files are approximately 3-5 times the size of a Jpeg file.

Un-processed Raw file

Processed raw file showing the city of London at night
Editing - Raw vs DNG
When it comes to editing a camera raw file vs editing a DNG there are some differences to be aware of.
Editing Camera Raw files
When editing a camera raw file, e.g. a Canon CR2 or Nikon NEF file, your edit settings are held in a separate side cart file called a XMP (Extensible Metadata Platform) file. As a quick example, if you increase the exposure of your image by one stop in a program such as Lightroom, that exposure setting will be held in the xmp file that is attached to the raw file, it won’t be held in the raw file itself.

A RAW files – edits are held within a separate XMP file.
This means you will have 2 files for every one image. And, in my opinion, the more files you have, the more chance you have of moving, losing or corrupting them!
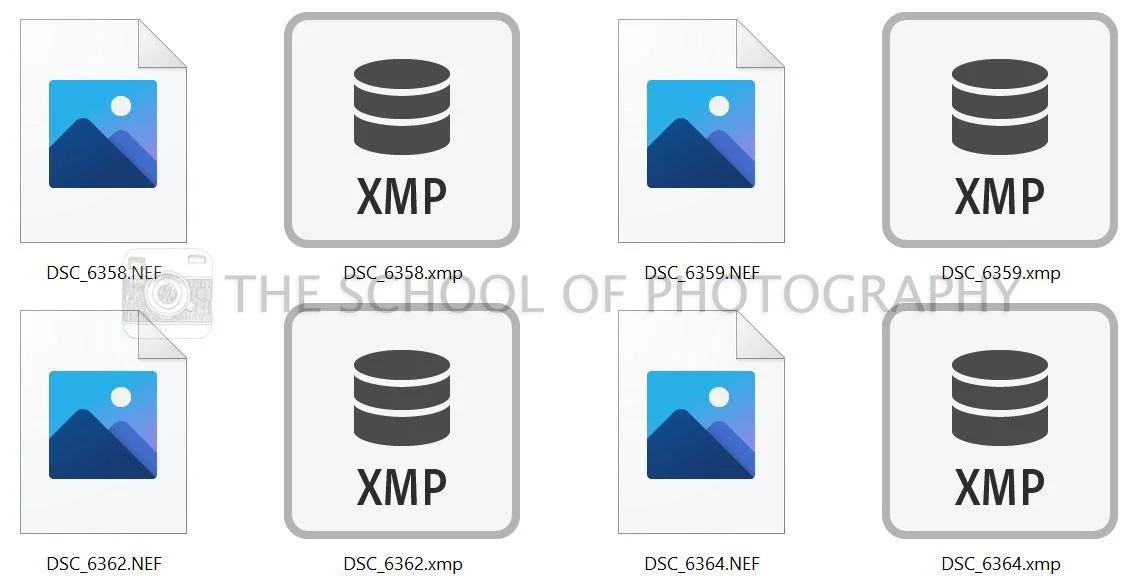
Example of Nikon RAW files with edits attached in a separate XMP file. This gives two files for every one image.
Editing DNG files
When editing a DNG, the edits are held within the dng file itself meaning you have one file per image not 2. And the dng file can then be opened in any raw post processing program and those same edits will appear. A much neater and more compatible way of working.

DNG files – edits are held within the dng itself
Pros and Cons of using DNG’s
Pros
Smaller file sizes.
Speeds up processing between Lightroom and Photoshop.
Unifies different camera raw files to one generic file format.
They are an archival file format.
Edit settings are held within the DNG file and not on a separate XMP file.
Can be editing in any raw processing program.
Cons
Can take extra time to convert Raw files to DNGs.
Could lose camera brand specific data.
How to convert a Camera’s native Raw to a DNG
It’s actually quite easy to convert raw files into dngs but you do need to have specific software to do it. Perhaps the easiest, or at least the most well known software to use is Adobe Lightroom. All you do in this program is convert the raw file to a dng on import. If you want to learn how to do this and more, please check out our Lightroom Course.
However, this is a paid program so will incur an extra cost. But, there is a free dng converter called Adobe Digital Negative Converter. This is a really good free alternative and also gives you the option to reduce the raw file size further on conversion should you wish.

Converting Camera Raw to DNG using Lightroom
My Personal Opinion
I prefer using DNGs and here’s why:
DNG’s are Raw files. I like using DNG’s as it keeps all my RAW files unified, it’s a generic file meaning it’s compatible with other programs. It also speeds up the workflow if working from LR to PS (fast computers won’t notice this much) and they give smaller file sizes.
I’ve never lost any data when converting but if you use brand specific stuff like in camera picture profiles etc, these will not import into Lightroom. If using Lr you would not do this in camera anyway as there’s no point changing things in camera if you’re going to be processing the photo later.
It’s also an archival format. E.g. in 20 years, canon might use a different RAW format meaning you may have to go back to a canon piece of software to open it again. A DNG is generic, like a JPEG, so it’s used to archive raw files.
It also holds the editing data in the DNG file and not on a separate xmp file which can tidy up your files and ensure you don’t lose the editing information in the future.
I use different cameras so for me it keeps things nice and neat. As far as the final image goes, it will make no difference in the processing or look.
Like this? - Check out similar tutorials below


I hope you liked this blog on DNG vs RAW files. If you did please leave us a comment and support us by sharing it with your friends and subscribe to our newsletter at the bottom of this page for more.
We also have an excellent learning community on social media so please join us there as well.
Thanks for watching and remember – Learn more at The School of Photography.
