How to create light beams in Lightroom
Light beams can transform a flat woodland scene into something magical. The shafts of sunlight filtering through trees create atmosphere, depth, and a sense of mystery that makes your image come alive.
But capturing those light beams naturally is rare. The weather, time of day, time of year, and location all must line up perfectly. You also need misty mornings, low sun, and clear patches in the canopy. So, getting all those things to line up might not be practically possible. Fortunately, Lightroom allows you to recreate those conditions digitally with just a few smart adjustments.
And please note: Post-processing isn’t about faking light; it’s about enhancing the light that was already there. In this tutorial, we’ll show you how to add realistic, natural-looking light beams to your photos using Lightroom’s Masking tools. This technique is quick, effective, and perfect for forest or woodland photography.
For a full tutorial in Masking in Lightroom, click here.
Do what you can in camera first
You don’t need any special gear for this technique, but getting the right photo to begin with will make your results more convincing.
1. A Good Base Image
Start with a well-exposed image that has a clear light source. This is typically the sun peeking through a gap in the trees. This will make your added beams look natural rather than artificial.
When framing your image in the field, think ahead: compose with the light source in mind. In this example, the sunburst was deliberately placed in the top-right corner, setting up a natural direction for the beams to travel through the scene.

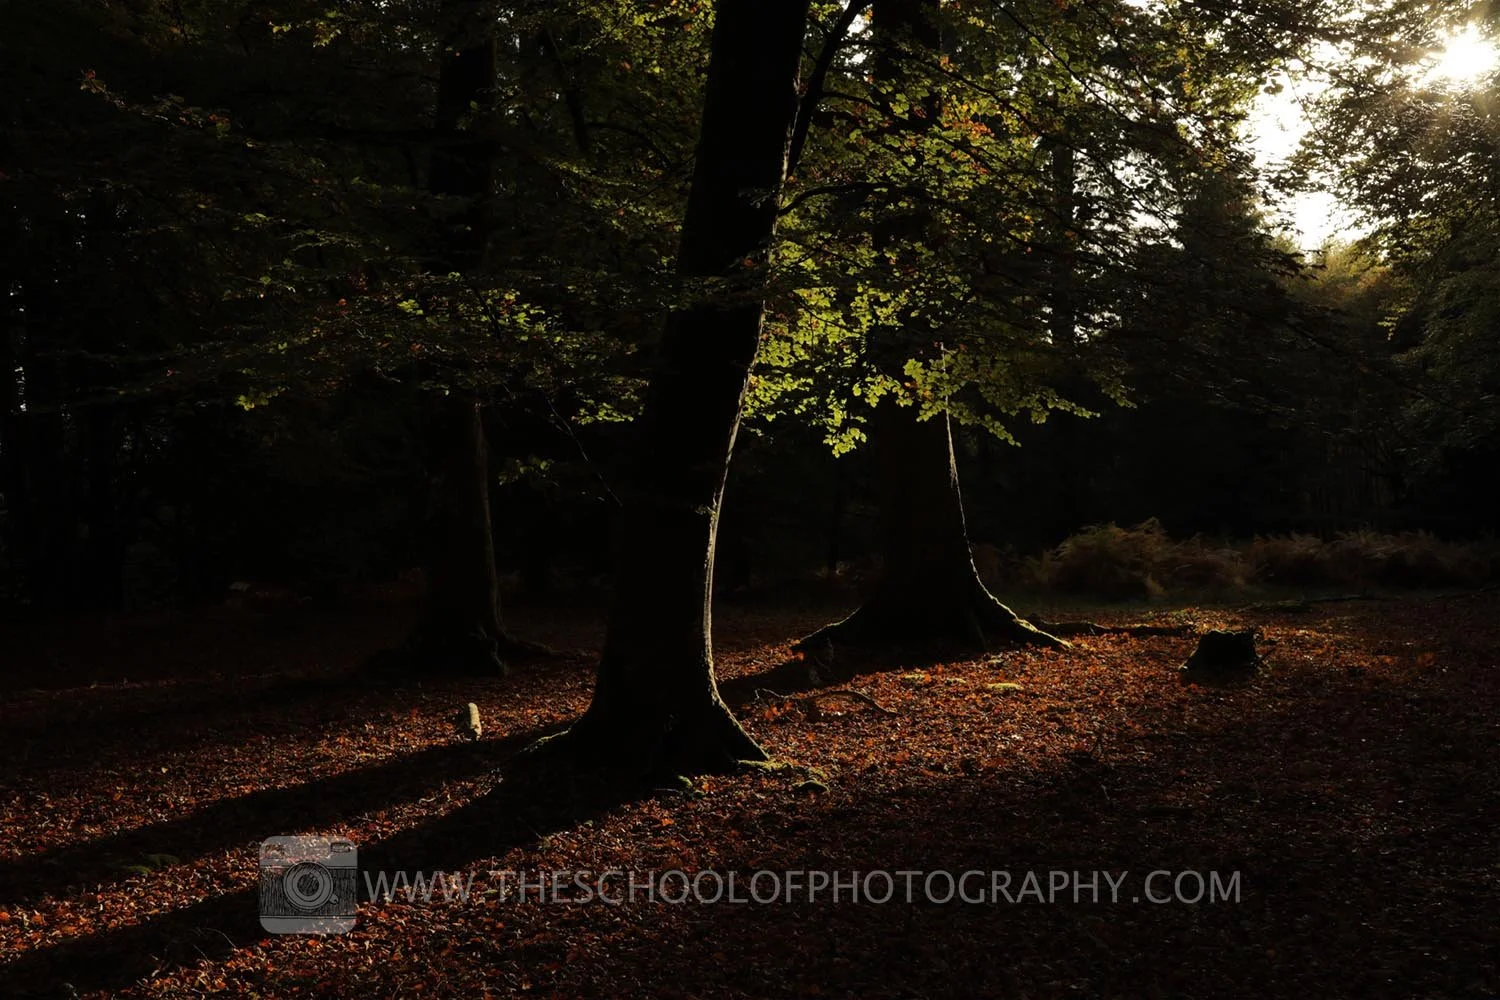
Our starting point — a simple woodland scene with natural light coming from the top right

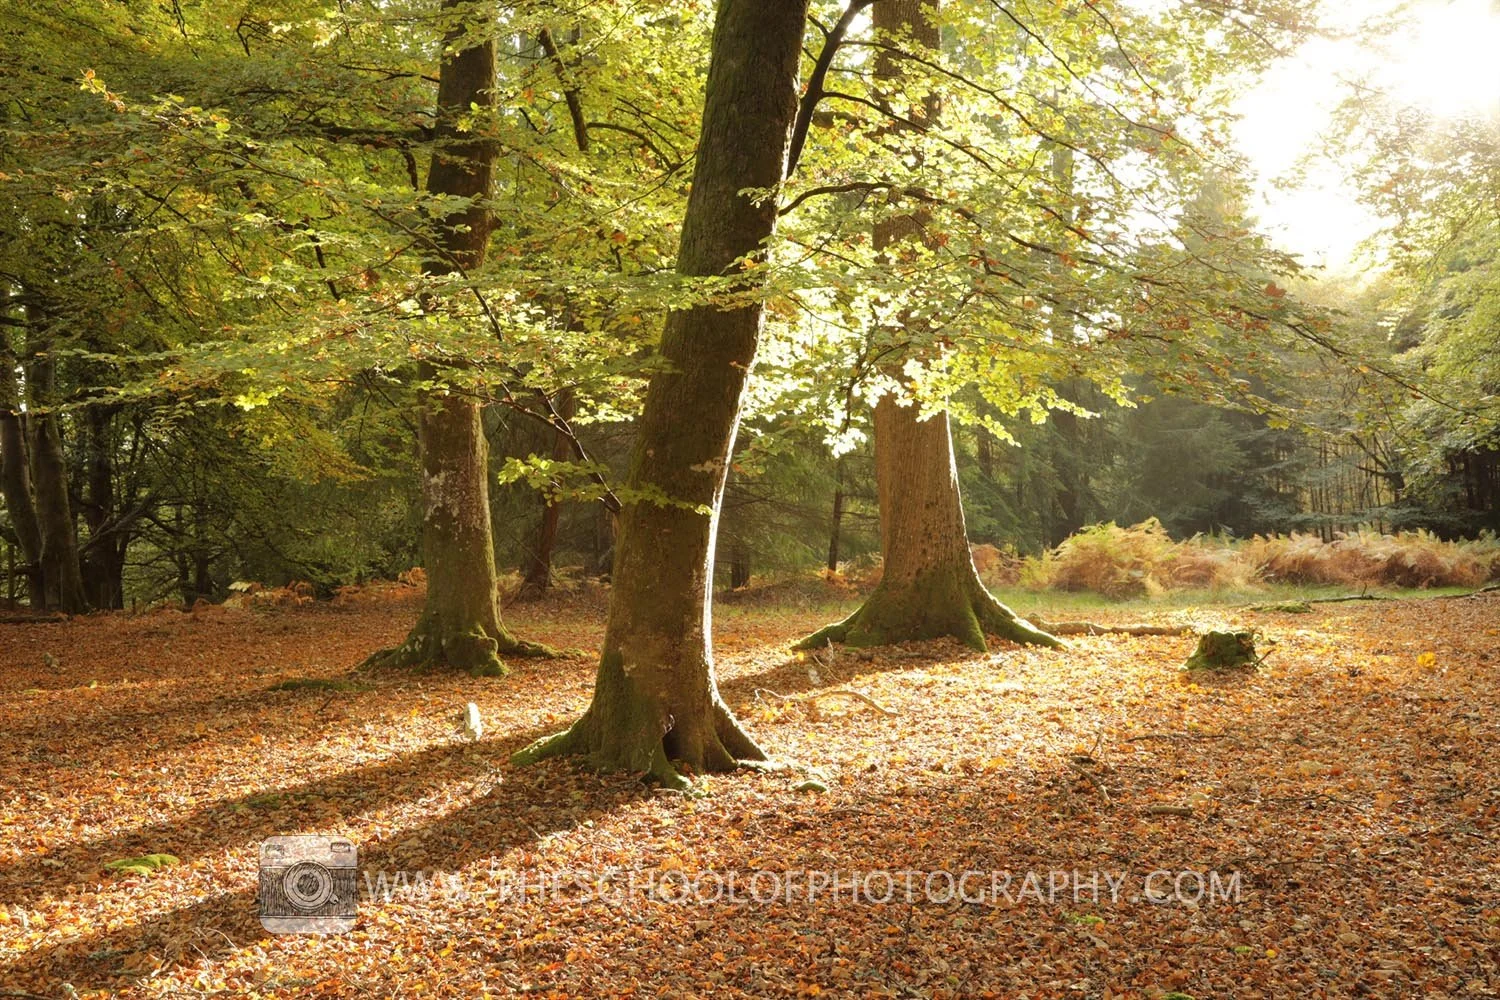
The final image — soft, realistic light beams enhance atmosphere and depth.
2. Shoot in RAW
RAW files preserve the detail and dynamic range you’ll need when adjusting light and shadow in post-production.
You’ll need the Masking tools in Lightroom — specifically the Brush and Luminance Range masks.
Tip: Get it right in-camera. Know where your light is coming from before you shoot, and you’ll have a much better foundation when editing later.
Check out our Forest Photography Course led by landscape expert Jake Lodge, where you’ll learn how to capture magical woodland scenes from the ground up.
Basic Edit in Lightroom
Begin with your base edit. Balance exposure, contrast, and colour before adding any creative effects. You can see the difference between the raw image and the final version — the light beams add atmosphere, but the foundation of the shot remains solid.
Raw image before basic edits

Base edit
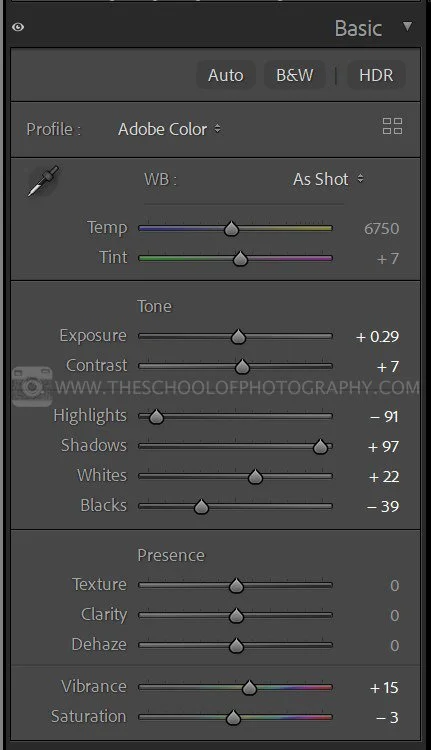
Lightroom Edits in the Basic panel
Creating the Light Beams
Now for the fun part — let’s create those beams.
1. Open the Masking Panel: Click the masking icon, then delete any existing masks.
2. Select the Brush Tool.
3. Set the following Brush settings:
Feather: 100
Flow: 100
Density: Around 90

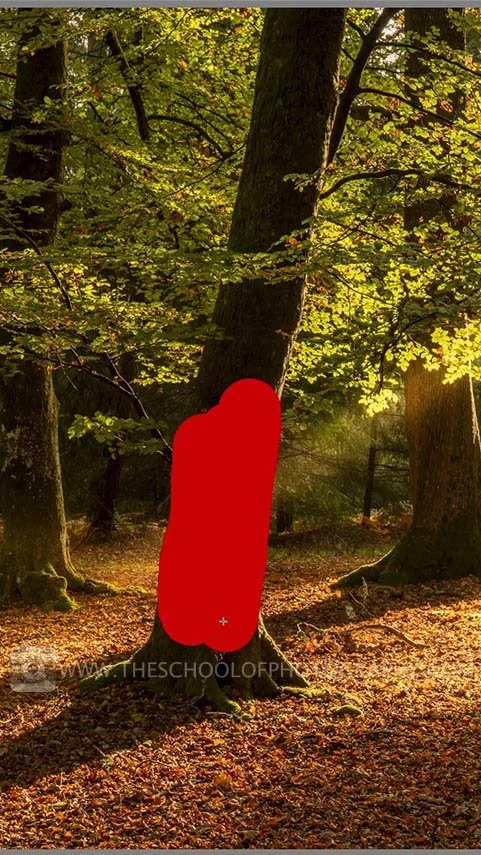
Open the Masking panel and select the Brush tool — this is where your light beams begin
Now identify your light source in the image (for example, a gap in the canopy).
4. Create a small brush > Click once near the light source.
5. Move down to where you want the beam to hit and enlarge the brush.
6. Hold Shift and click again — Lightroom will draw a perfect, tapered beam between those two points.
7. Repeat for additional light beams where natural highlights occur on the forest floor.

Hold Shift and click to draw perfect, tapered light beams from your light source into the scene
Tip: Light beams should enhance, not overpower. Look for areas already catching light and use them as guides.
Get access to ALL our online courses - 1000’s of videos, worksheets, critiques of students work, personalised support and much more with our monthly membership.
Refining the Beams
Once your beams are in place, fine-tune the effect:
8. Lift Exposure and Highlights slightly to make them glow.
9. Adjust the Amount slider to control strength.
You can also gently paint in extra light around bright spots to balance the composition — for example, where sunlight might scatter through mist or branches.
Adding Warmth
Natural sunlight is warm, especially during golden hour.
10. Increase the Temperature slider slightly toward yellow/orange to make the light feel more realistic.
Toggle the mask on and off — you’ll see how those subtle beams completely change the mood of your shot.

Brush masking settings
Making the Beams Interact with the Scene
To keep things believable, light shouldn’t fall where it logically wouldn’t — such as behind a tree trunk or under dense branches.
11. Make sure you are still selected on your beam mask.
12. Click Subtract > Object.
13. Paint over the tree or branch that should block the beam. Lightroom will automatically detect the object and remove the light beam from that area.
14. For smaller details, choose Subtract > Brush and paint manually to remove light from under branches or shadowed spots.
These refinements make the effect look natural — as if the beams are weaving through the trees, not over them.
Use Object Masking to remove sections
Adding a Luminance Range Mask
To add a warmth to the main light source itself (like a warm glow at the top of the frame):
15. Create a new mask and select Luminance Range.
16. Use the eyedropper to click on the brightest area of your light source.
17. Adjust the range slider to narrow it down to the highlights.
18. Increase Temperature for warmth and Saturation if needed.
This small touch adds richness and realism — making your light source match the tone of your beams.

Luminance range mask
Extras - The Power of HDR Editing
If you’re shooting into the sun, you’ll often get strong contrasts and dark tree trunks. This is where HDR helps.
By blending three bracketed exposures (one normal, one underexposed, and one overexposed) you can retain detail in both highlights and shadows. Lightroom’s HDR Photo Merge feature makes this simple. With the HDR base, your edited beams will sit naturally within a balanced tonal range.
-2 stops
0
+2 stops
Conclusion
Still life flower photography is one of the most rewarding ways to develop your eye for detail and composition. It slows you down and encourages you to think about every aspect of the image — from how the petals curve to how light falls across the vase. By experimenting with lighting direction, aperture, and arrangement, you’ll soon start to see how subtle changes can transform a simple setup into something extraordinary.
Whether you’re shooting in a lightbox or by a window, the goal is the same: to create images that feel timeless and intentional. Don’t be afraid to play with textures, try new lighting angles, or edit your shots with a fine-art finish. The more you explore, the more you’ll refine your creative voice.
Final image
Like this? - Check out more free tutorials below


I hope you liked this tutorial on how to create light beams in Lightroom. If you did, please leave us a comment and support us by sharing it with your friends and subscribe to our newsletter at the bottom of this page for more.
We also have an excellent learning community on social media so please join us there as well.
Thanks for watching and remember – Learn more at The School of Photography.