Bluebell Photography: Tips, Techniques & Settings
Here we will be showing you a great idea for bluebell photography. We’ll be taking full advantage of spring to get that classic bluebell shot and be giving you loads of tips and techniques along the way. We’ll also look at the best camera settings and equipment to use to ensure you get the best photography of bluebells you can.
Plus, you can download our free guide to bluebell photography. Take this on your shoot to make sure you get great photos. Grab the guide below.
Get access to ALL our online courses – 1000’s of videos, worksheets, critiques of student’s work, personalised support and much more with our monthly membership.
Free Bluebell Photography Guide
Bluebell Photography Tips
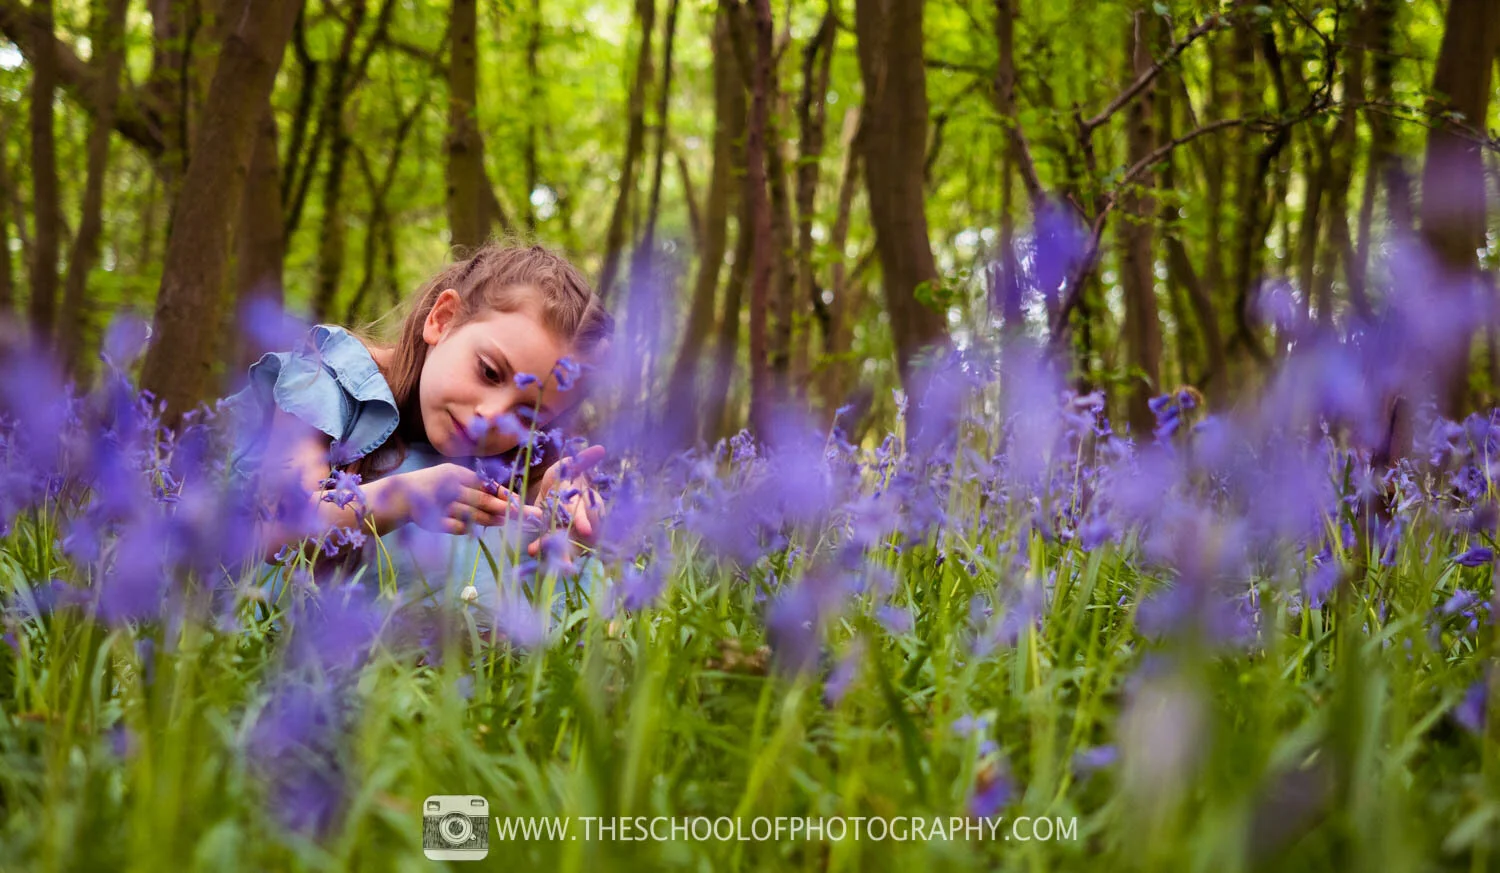
The first thing you need in any shoot is an idea. For our idea, we have chosen to use the beauty of bluebells to enhance a portrait and in particular a children’s portrait. This is a classic shot and let’s face it, who doesn’t want great shots of their children in this lovely spring environment.
Colour Palette for Bluebell Photography
On a shoot like this, the colour of the clothes your model is wearing is important. Choose a colour palette to work from that matches the clothes to the colours as much as possible. This will create a more harmonious look to the photo. Also avoid checks, stripes, spots and logos if you can.
Below is the colour palette I used for this shoot. This was simply given to the client and they matched the clothing to the colours – Easy!
A great place to get colour palettes for shoots is the Adobe Colour web site, click to view this https://color.adobe.com

Colour palette for bluebell photography shoot to match clothing tones with bluebell woodland environment
Camera Settings For Bluebell Photography
There’s no one fixed camera setting for photographing bluebells as different ideas will require different settings but if you want that classic bluebell photo like in our photography, use the settings below.
Aperture & Depth of Field Settings
Try to use a wide aperture such as f2.8 to give you a shallow Depth of Field. This will create a soft look and make the bluebells blur in the foreground and the background.
Shutter Speed Tips
You will need a fast shutter of 1/125th of a second or above to avoid camera shake. Handholding a camera, models moving and using a zoom lens all increase the chances of camera shake happening.
Choosing the Right ISO
Keep your ISO as low as possible as this will help reduce noise in your image. The ISO will change depending on the light available at the time. As you need to work quickly, putting your camera on auto ISO may help you here.
In our shot the lowest ISO was 400 and the highest was 640. To learn more about camera setting and how to control visual effects, click here.
Lens & Focal Length Advice
Choosing the right lens can make a huge difference in bluebell photography. Wide-angle lenses (16–35mm) are ideal for capturing sweeping woodland scenes, especially when you want to show carpets of bluebells leading into the distance. Using a wide lens close to the flowers can also exaggerate foreground interest and create strong leading lines.
For more intimate or creative images, a standard zoom or prime lens (35mm–50mm) works well. These focal lengths produce a natural perspective and are excellent for isolating small groups of bluebells while still including context. Telephoto lenses (70–200mm) are useful for compressing layers of flowers and trees, helping to simplify busy woodland backgrounds and create a softer, more abstract look.
Shooting Through the Bluebells
Shooting through the bluebells is a powerful technique for creating depth and atmosphere in your images. By positioning your camera low to the ground and placing flowers close to the front of the lens, you can use foreground blur to frame your subject naturally. This works especially well with wider apertures such as f/2.8 or f/4, which create a soft, dreamy effect.
Take time to move slowly and carefully through the woodland to avoid damaging the flowers. Even small changes in camera height or shooting angle can dramatically alter how the foreground blur interacts with the main subject. This technique is ideal for adding a sense of immersion and drawing the viewer into the scene.
Editing in Lightroom
Editing plays a key role in bringing out the colours and mood of bluebell photography. In Lightroom, start by adjusting white balance to ensure the blues look natural — woodland light can often introduce unwanted green or yellow colour casts. Slightly increasing contrast and clarity can help define details, but avoid overdoing it as bluebells suit a softer look.
Use the HSL panel to fine-tune blues and purples, enhancing saturation carefully so the colours remain realistic. Local adjustments, such as graduated filters or radial masks, are effective for subtly brightening the main subject or guiding the viewer’s eye through the image. The goal is to enhance the atmosphere of the woodland while keeping the edit clean and believable.
Best Equipment For Bluebell Photography

Mirrorless camera setup with lens and settings used for bluebell photography in woodland
Of course, you can use any camera to get a picture but if you want to really control visual effects you need to use a DSLR or mirrorless camera with manual settings. In our shot we use a mirrorless camera with a zoom lens.
Focal Length:
The focal length you use for portraits is important. In short your focal length is your angle of view and good focal lengths for portraiture can be found below. This will make the model and scene look natural, it will be flattering for faces and help throw the background out of focus.
For more info on focal lengths in photography, click here.
Composition Techniques
Shoot through the bluebells at a low viewpoint. This will create a lovely soft look to the foreground of the shot.
Wide composition shot through bluebells at 40mm, shallow depth of field and soft foreground blur
As you are in woodland, try shooting through the trees to create a frame within a frame. This is a great technique to draw the viewers eye to the main part of your scene.

Bluebell woodland photography sample at 40mm showing depth and natural frame through trees
Post-Processing & Editing Tips
Post processing is what you do to a photo after you’ve taken it and all professional photographs will be post-processed in some way. Below is what I added to the shots in Lightroom.

Raw bluebell photo before Lightroom post-processing — flat colours and contrast

Bluebell image after Lightroom edits with enhanced contrast, saturation and tonal adjustments.
I used Lightroom to add general adjustments which increased contrast, saturation and sharpness. Split toning and curve adjustments were also added to colour tone the image. To learn how to use Lightroom properly click here.
Share Your Bluebell Photos
We love to see work inspired by our tutorials. If you want to show us yours, simply follow us on Facebook or Instagram and tag your shots #theschoolofphotography
And don’t forget you can download our free guide to Bluebell photography to take with you on your shoot. Grab this at the bottom of the page.
Bluebell Photo Examples

Bluebell photography example highlighting vibrant colours and shallow depth of field

Example bluebell photo at 40mm showing soft woodland backdrop and portrait-ready depth of field.

Additional example of bluebell woodland portrait with soft foreground and background blur
Take your photography to the next level
Like this? - Check out free tutorials below


I hope you liked this photography tutorial, please leave us a comment and support us by sharing it with your friends and subscribe to our newsletter at the bottom of this page for more.
We also have an excellent learning community on social media so please join us there as well.
Thanks for watching and remember – Learn more at The School of Photography.

Marc Newton