Bright Sun, Harsh Light – What do you do?
Golden hour is a dream for photographers — soft, warm light and beautiful shadows. But in the summer months, sunrise can be 4.30am, sunsets can be 9pm and real life doesn’t always let us hang around for these times.
So, what happens when you’re stuck taking photos in the middle of the day with blinding sun and harsh light? Can you still take great photos? Absolutely — if you know a few key techniques.
This guide walks you through how to turn bright sun from a problem into an asset, using a real shoot in London as an example.
Work with What You Have
On this particular shoot, I was in London around 4–5 p.m. in the middle of summer. I couldn’t wait for golden hour. I had to get back to prepare for a training course I was running the next morning. The light I had to work with was harsh and the sun was high so it wasn’t perfect, but it was workable.
The trick: use the conditions creatively rather than fighting them. It’s a mindset shift every photographer should practice. When you can’t control the light, control how you respond to it.
Want to learn how to control every aspect of your photography properly? Click here to check out our beginner’s photography course

Before

After
Get access to ALL our online courses - 1000’s of videos, worksheets, critiques of students work, personalised support and much more with our monthly membership.
Tip 1 - Use a 10-Stop ND Filter
One of the simplest and most effective tools for handling bright, midday sun is a 10-stop neutral density (ND) filter. A 10-stop neutral density filter works like sunglasses for your camera. It cuts down the light entering your camera so you can use longer exposure times to:
blur moving clouds.
Smooth out water for a sleek, glass-like effect.

Camera with 10 stop ND filter
Even in bright sun, combining a small aperture (f/16), low ISO (50), and the 10-stop filter gave me 30-second exposures. This added atmosphere and interest that you simply can’t get from a straight snapshot.
Learn more about ND Filters here: ND Filters – In Depth Guide For Beginners
The beauty of this technique is that it gives interest to the picture. You are not used to seeing streaking clouds in the sky or water looking smooth as glass. Those features stand out in an image and draw attention from the viewer.

Before - Taken with a shutter speed of 1/200th second

After using a 10 stop ND filter, shutter speed is now 30 seconds
If you want to learn about Long Exposure Photography in depth, click here.
Tip 2 - Think in Black & White
When the midday sun is blazing, colours can quickly become your enemy. Strong light has a way of washing out subtle tones, oversaturating certain hues, and casting unwanted colour tints into your scene.
This is exactly where black and white photography becomes your best friend. By stripping away colour completely, you’re no longer battling white balance or washed-out skies. Instead, you can focus on what midday light does give you in abundance: contrast, shape, and texture.
In black and white:
Harsh shadows become a design element, shadows start carving dramatic lines across the frame.
Bright highlights pop with intensity, giving the image a sense of sharpness and clarity.
Textures — whether it’s rippling water, weathered stone, or steel architecture — take on a tactile quality that colour sometimes hides.
The trick is to shoot with black and white in mind from the start. Pay attention to tonal contrast as well as the subject. Ask yourself: where’s my brightest point? Where’s my deepest shadow? Where can I find contrast in this scene? Can I use that to lead the viewer’s eye?
When you stop thinking about the colours you’ve lost and start seeing the shapes you’ve gained, bright midday light goes from frustrating to inspiring.

Tip 3 - Composition is King!
Technical tricks like ND filters and black-and-white conversion are powerful, but they can’t save a poorly composed image. Composition is what turns a technically correct photograph into one that grabs the viewer’s attention and holds it.
When shooting in harsh midday light, composition becomes even more important because you can’t rely on soft light or rich colours to carry the mood. You must make the structure of the image do the heavy lifting.
On my London shoot, I focused on a few key compositional strategies:
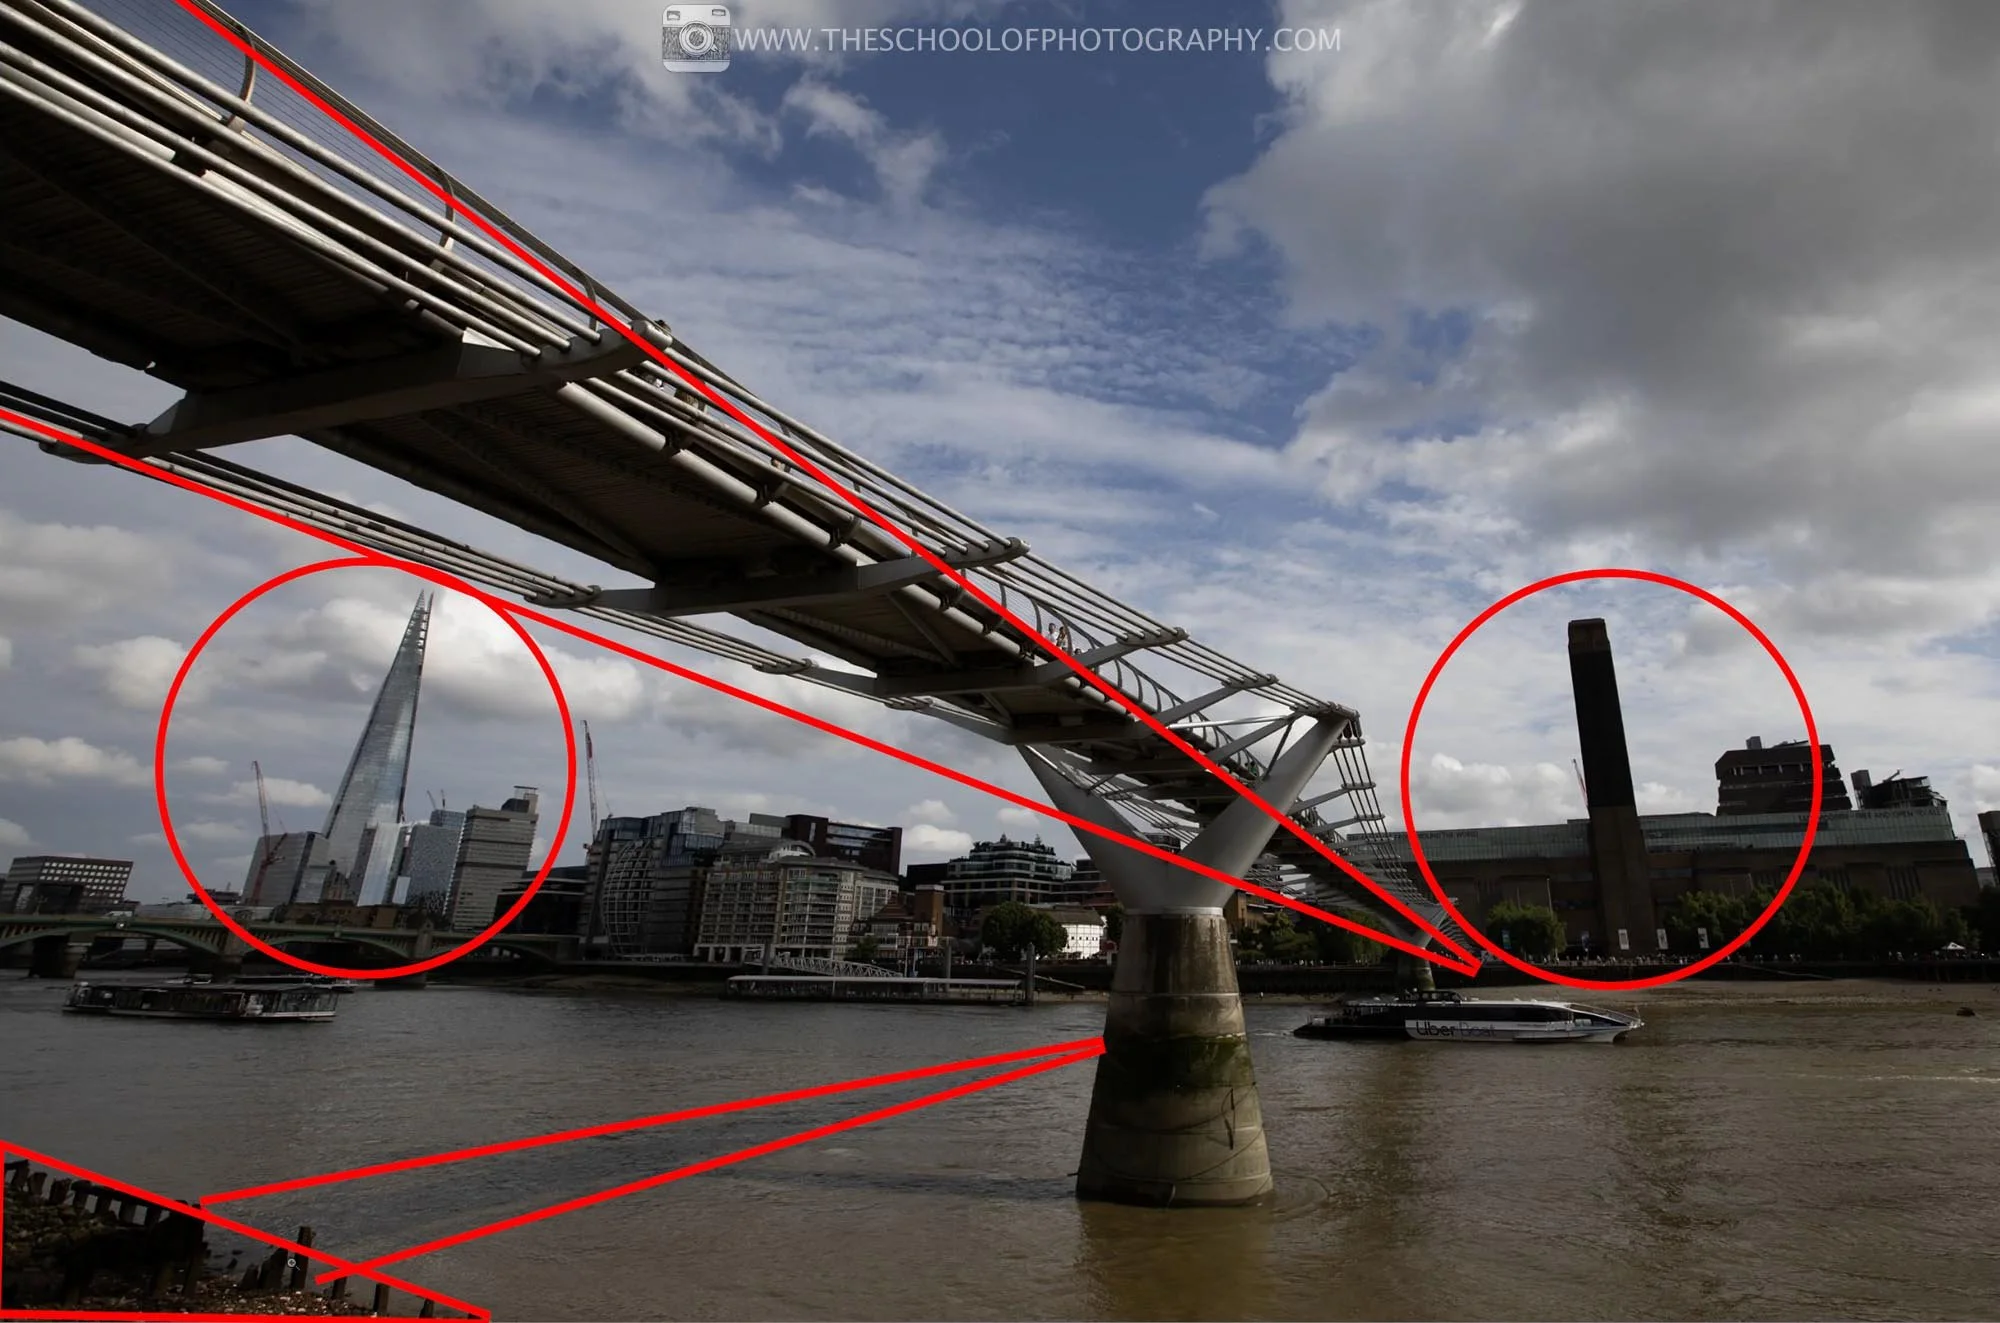
Strong diagonals — The Millennium Bridge provided a perfect, sweeping diagonal that sliced through the frame and naturally led the eye toward the Tate Modern in the background.
Foreground interest — Weathered wooden posts along the riverbank acted as anchors in the scene, giving depth and a sense of place before the eye travelled further into the shot.
Balanced elements — I aligned the Shard, so it sat neatly beneath the bridge’s arc while the Tate Modern tower played balance to this on the opposite side of the frame. This gave visual stability to an otherwise busy scene.
Use of shadows — Harsh sunlight created a bold, geometric shadow shape on the Thames. Instead of avoiding the harsh light, I waited for the right moment to capture this shadow and added it as a compositional element.
By being intentional with composition, you take control of how the viewer eye moves through your image. You’re essentially directing their gaze — where to start, where to pause, and where to end.
What is Composition in Photography? Learn more here
Carefully composing your photography can make all the difference.
Tip 4 - Edit to Enhance
Clearly editing plays a big part in any photography and that is the same here. With pictures like this it’s about putting balance into the exposure of the image and enhancing that contrast you purposely included during your picture taking. I’m doing my edits in Adobe Lightroom Classic but you can adapt these skills into any program.
Here is my workflow for harsh light:
1. Convert to black and white straight away
The first step is to remove colour distractions and focus purely on tonal values. Harsh sunlight often creates high contrast and strong shadows that work beautifully in monochrome.
Converting early lets me see where the light and shadow interact, which guides all subsequent adjustments.
2. Start with basic pane adjustments
Exposure: Slightly adjust to balance the midtones without losing highlights.
Highlights: Pull down to recover detail in bright areas like reflective surfaces or the sky.
Shadows: Open them just enough to reveal texture in dark areas, such as under bridges or alleyways.
Whites & Blacks: Fine-tune the extremes to ensure the image retains depth without clipping.
3. Add an S-curve for punchy contrast
I apply a subtle S-curve in the Tone Curve panel. This deepens shadows while boosting highlights, giving the image dimension and a sense of three-dimensionality. It’s particularly effective for architectural shots where structural lines need to pop.
Learn more about using curves here.
4. Use the Black & White Mixer panel
The Black & White Mixer lets you adjust the luminance of individual colours. For instance, increasing the blue channel darkens the sky, creating drama and separating it from the clouds.
Similarly, adjusting reds or yellows can subtly emphasize or de-emphasize buildings, streets, or water reflections.
5. Apply subtle vignetting
Adding a soft vignette draws the viewer’s eye toward the centre of the frame.
I keep it subtle — just enough to focus attention without making the edges feel artificially dark.
6. Mask selectively
Target specific areas using, linear, radial, brush and object select masks. For example here I brighten the underside of the bridge, increase texture and lightened the tone on building façades.
Masking allows localized adjustments that help balance the exposure of the scene. Check out our Masking in Lightroom Tutorial here.
Masking can transform a flat shot into something dynamic and balanced.

Strong knowledge in editing will help you use harsh light to your advantage.
Key Takeaways for Photography in Harsh Sun
Use a 10-stop ND filter for creative motion effects.
Embrace black and white to work with contrast instead of fighting it.
Look for shadows, contrast and lines to add visual drama.
Composition is key — foreground interest, leading lines, and balance are essential.
Edit with purpose — enhance strengths, mask weaknesses.
FAQ – Photographing in Bright Sun | Harsh Lighting Photography
What is harsh light in photography?
In harsh lighting photography, harsh light refers to strong, direct light that creates deep shadows, high contrast, and bright highlights. It typically occurs when the sun is high in the sky, such as around midday.
Harsh light produces hard edges between light and shadow, which can make details difficult to capture and often creates unflattering shadows in portraits, especially under the eyes and nose.
What does "harsh light" mean?
"Harsh light" describes light that is intense and undiffused, resulting in strong contrast and sharply defined shadows in a photograph. In harsh lighting photography, this type of light often comes from direct sunlight or a small, powerful light source without diffusion.
While harsh light can be challenging to work with, photographers sometimes use it creatively to produce dramatic shadows, bold textures, and high-contrast images.
What makes photographing in bright sunlight difficult?
Bright sunlight creates hard light, which produces strong contrast, deep shadows, and blown-out highlights. This makes it harder to balance exposure and capture detail across the entire scene.
What are the best camera settings for photographing in bright sun?
A common starting point is the Sunny 16 rule, which suggests using f/16 aperture, ISO 100, and a shutter speed around 1/100–1/125 sec on a bright day. Adjust shutter speed or aperture from there depending on the scene and desired depth of field.
What lens filters are recommended for harsh lighting photography?
When shooting in harsh lighting conditions, a neutral density (ND) filter can help control exposure by reducing the amount of light entering the lens. This allows photographers to use wider apertures or slower shutter speeds without overexposing the image.
For example, a NiSi 10-stop ND filter is a popular choice for harsh lighting photography because it dramatically reduces light, making it possible to capture long exposures in bright sunlight, smooth moving water, or blur clouds during the middle of the day.
ND filters are especially useful for landscape photography, seascapes, and creative long-exposure shots taken in strong sunlight.
How do you avoid harsh shadows when shooting outdoors?
You can reduce harsh shadows by:
Moving your subject into open shade
Using a diffuser to soften the light
Shooting when the sun is lower in the sky
Using a reflector to fill in shadow areas
How can you reduce glare in photos taken in bright sunlight?
To minimise glare and reflections:
Use a polarising filter
Change your shooting angle
Use a lens hood
Avoid shooting directly into strong reflective surfaces
These techniques help improve contrast and colour in bright conditions.
What is the best time of day to photograph in bright sun?
The best times are usually early morning or late afternoon, when the sun is lower and produces softer, warmer light. Midday sun tends to be harsher and creates stronger shadows.
Should you shoot in the sun or the shade?
Both can work. Shooting in shade produces softer light, which is flattering for portraits. Shooting in direct sun can create dramatic contrast and strong shapes if used creatively.
How do you prevent overexposed highlights in bright sunlight?
To prevent blown highlights:
Lower your ISO
Use a smaller aperture (higher f-number)
Increase your shutter speed
Use exposure compensation or shoot in RAW to recover details later.
Can bright sunlight be used creatively in photography?
Yes. Hard sunlight can produce bold contrast, dramatic shadows, silhouettes, and interesting textures. When used intentionally, it can add depth and impact to images.
What accessories help when photographing in bright sunlight?
Useful tools include:
Polarising filters (reduce glare)
ND filters (control exposure)
Diffusers (soften light)
Reflectors (fill shadows)
These help control harsh lighting and improve overall image quality.
How do you photograph portraits in bright sunlight?
For better portraits in bright sun:
Position your subject with the sun behind them
Use a reflector or fill flash
Move them into open shade
Watch for strong shadows under the eyes and nose.
Conclusion
Bright midday sun is challenging, but with the right skills, you can produce images worthy of your portfolio.
So next time you’re in the middle of the day with no golden hour in sight — don’t pack up your gear. Use the light, shape your composition, and let your editing polish the rest.
Like this? - Check out more free tutorials below


I hope you enjoyed this tutorial about creating great photos in harsh light. If you did, please leave us a comment and support us by sharing it with your friends and subscribe to our newsletter at the bottom of this page for more.
We also have an excellent learning community on social media so please join us there as well.
Thanks for watching and remember – Learn more at The School of Photography.

Marc Newton