Still Life Flower Photography: Fine Art Guide
Still life flower photography is where photography meets fine art — a quiet, deliberate craft that transforms a simple bloom into a study of light, texture, and form. Unlike outdoor flower photography, where you react to the conditions around you, still life work puts you fully in control. Every petal, vase, and shadow becomes a conscious choice.
In this tutorial, we’ll explore how to photograph flowers as fine art still life subjects. Using a simple lightbox setup, you’ll learn how to shape light, balance composition, and create timeless images inspired by the still life paintings of the Old Masters. From setting up your shot to controlling the mood through lighting, this guide will help you turn everyday flowers into beautifully composed pieces of photographic art.
Essential Equipment for Still Life Flower Photography
Still life flower photography doesn’t require a studio full of expensive kit — just a few key tools that help you control light, background, and focus. Here’s what you’ll need to get started:
1. Camera and Lens - Any DSLR or mirrorless camera with manual settings will do, as long as you can control aperture, shutter speed, and ISO.
A standard lens (50mm Full frame or 35mm Crop sensor) is ideal for balanced compositions that include both the flower and the vase. While macro lenses are fantastic for close-up flower photography, a standard lens gives you more breathing space for still life setups.
Tip: Use a tripod and lower your ISO for maximum sharpness. Still life scenes give you the luxury of time — take advantage of it!
Full frame or crop sensor? Camera Sensor Size Comparison – Which one is right for you?
2. Tripod - A sturdy tripod is essential. You’ll be working with careful lighting and fine focus, so camera stability is key — especially for longer exposures or when using timer shots to position light manually.

The Best Camera Tripod – Complete Buyers Guide
3. Light Source - Good lighting is what turns an ordinary setup into something magical. You can use:
A lightbox (perfect for small arrangements)
A continuous LED panel
Or simply natural window light if you prefer a softer, classic look
You can even add a torch or reflector to shape light direction and depth.
Tip: Experiment with where your light comes from — side lighting creates drama, top lighting feels softer and more traditional.

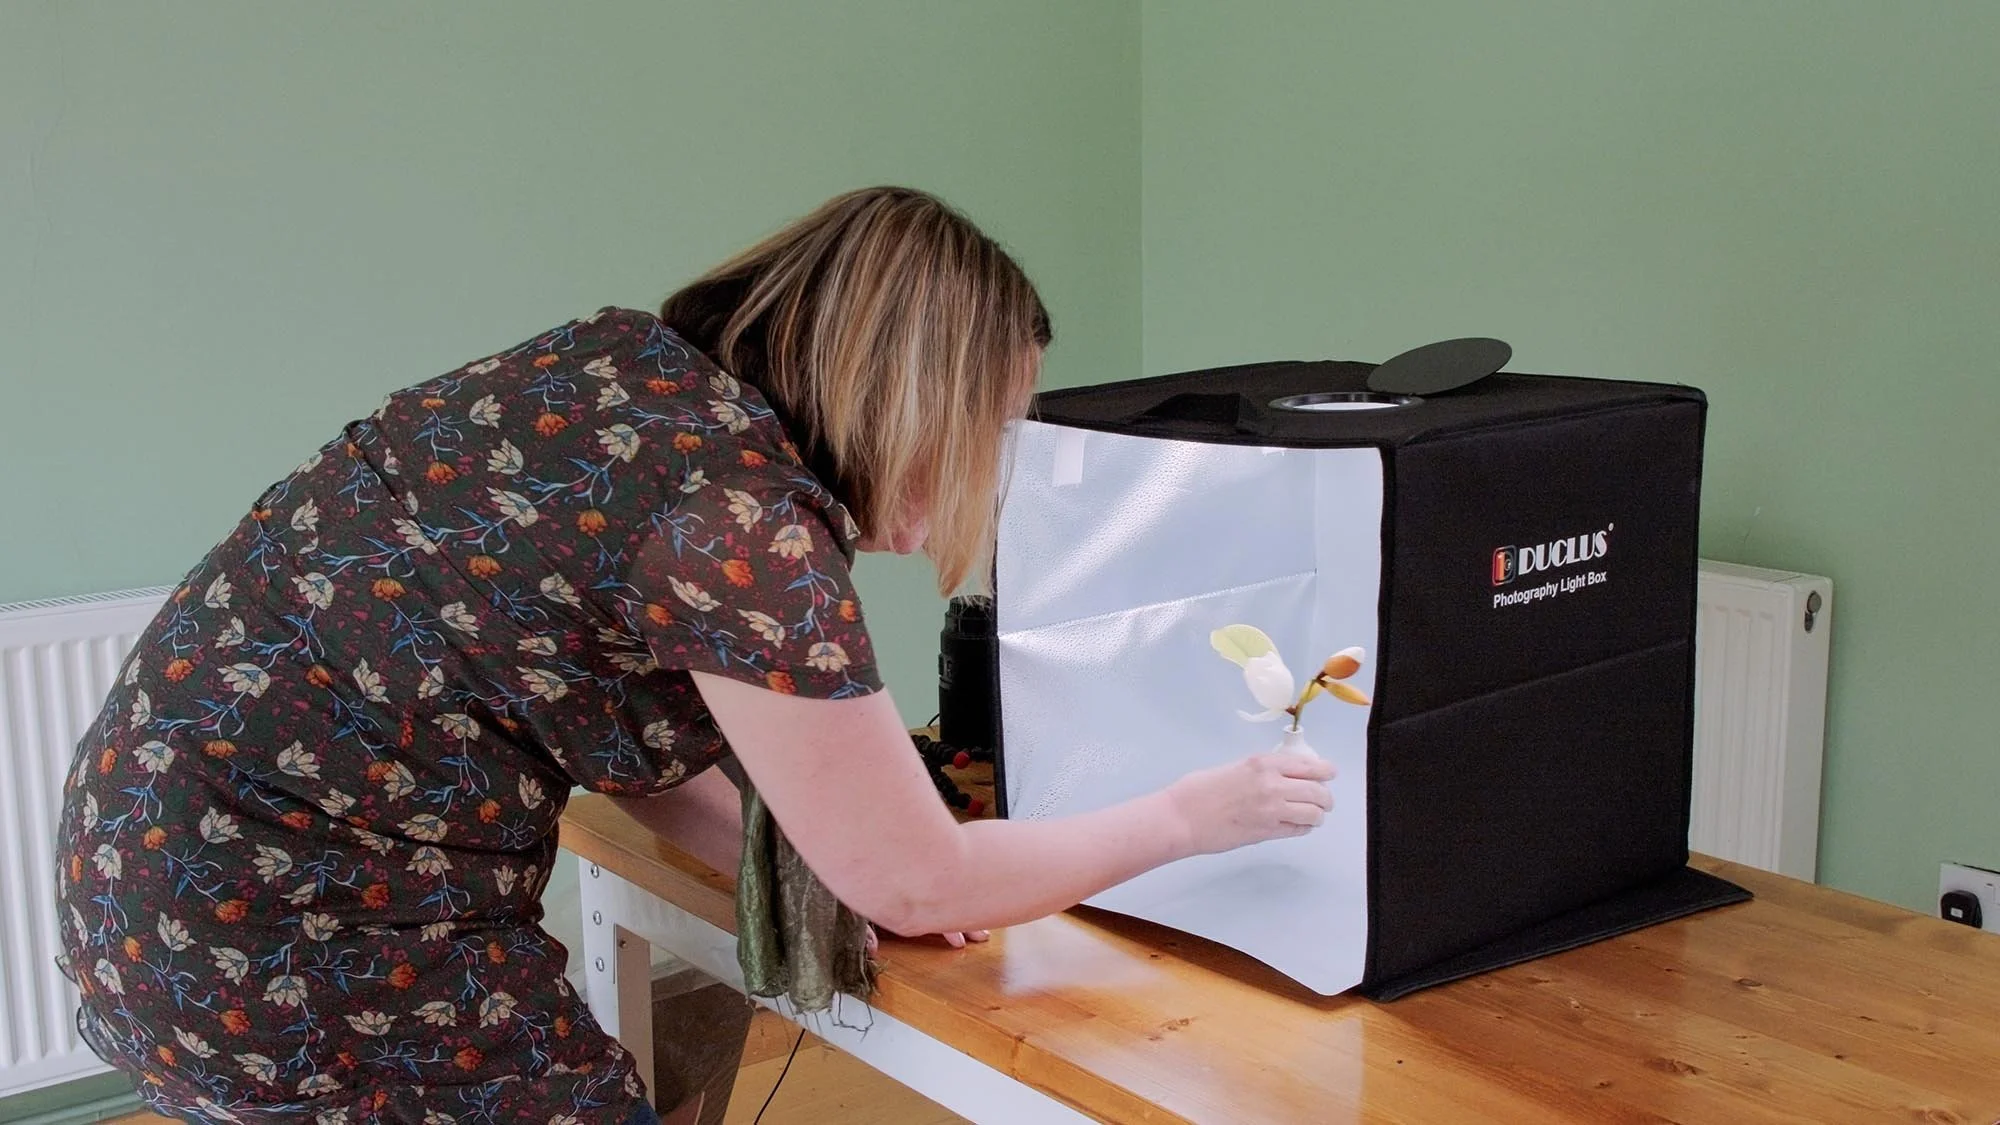
Lightbox
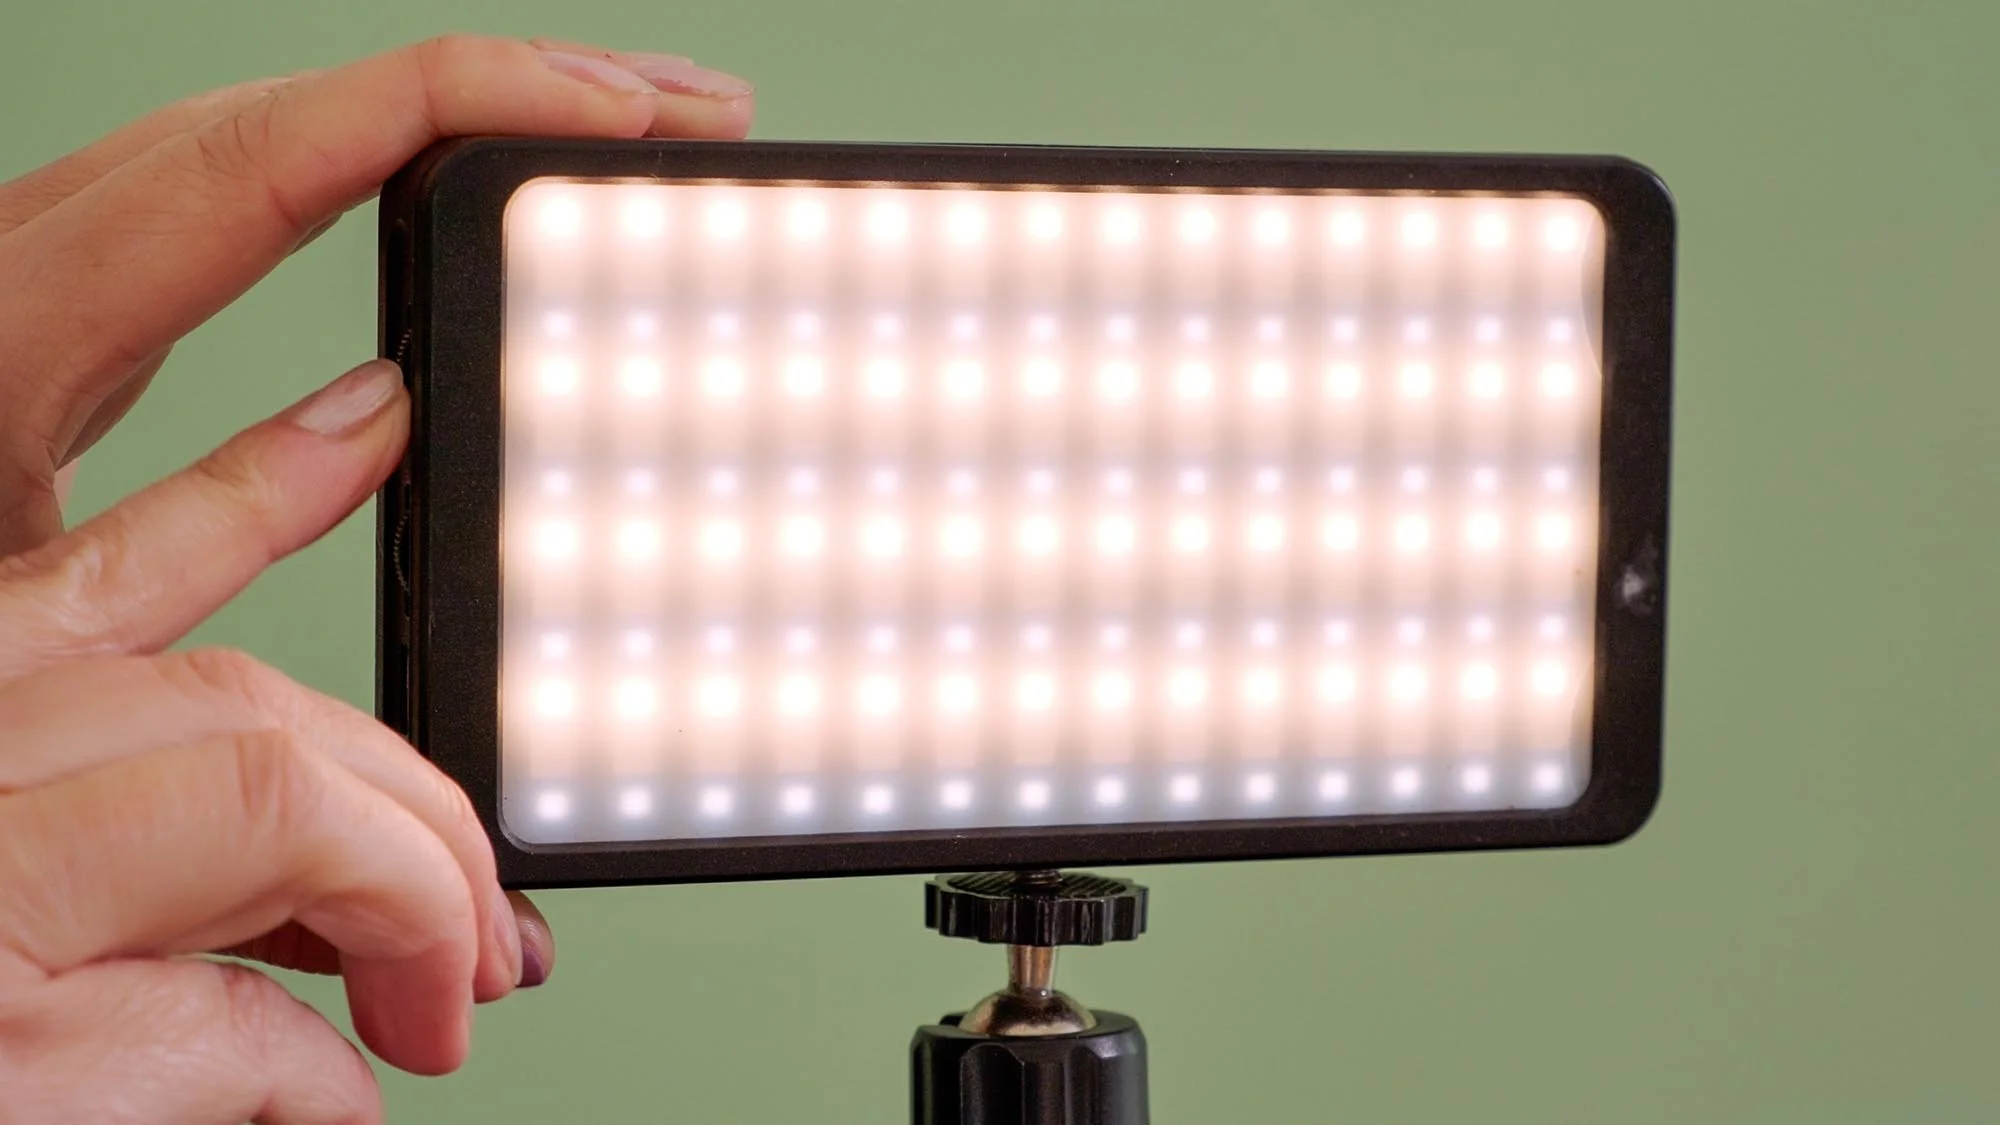
LED panel
4. Backgrounds and Surfaces - Keep things simple. A piece of neutral-coloured card (grey, beige, or black) works brilliantly as a background.
For your surface, try textured card, wooden boards, or even fabric — anything that complements your subject without distracting from it.

5. Props and Subjects - A few small vases, ceramic jugs, or glass bottles are great for variety. Start with one or two flowers per shot — tulips, roses, and magnolias work beautifully for their shape and form.
Remember, still life photography is all about balance, so spend time arranging your elements before you shoot.

Setting the Scene: Building a Still Life
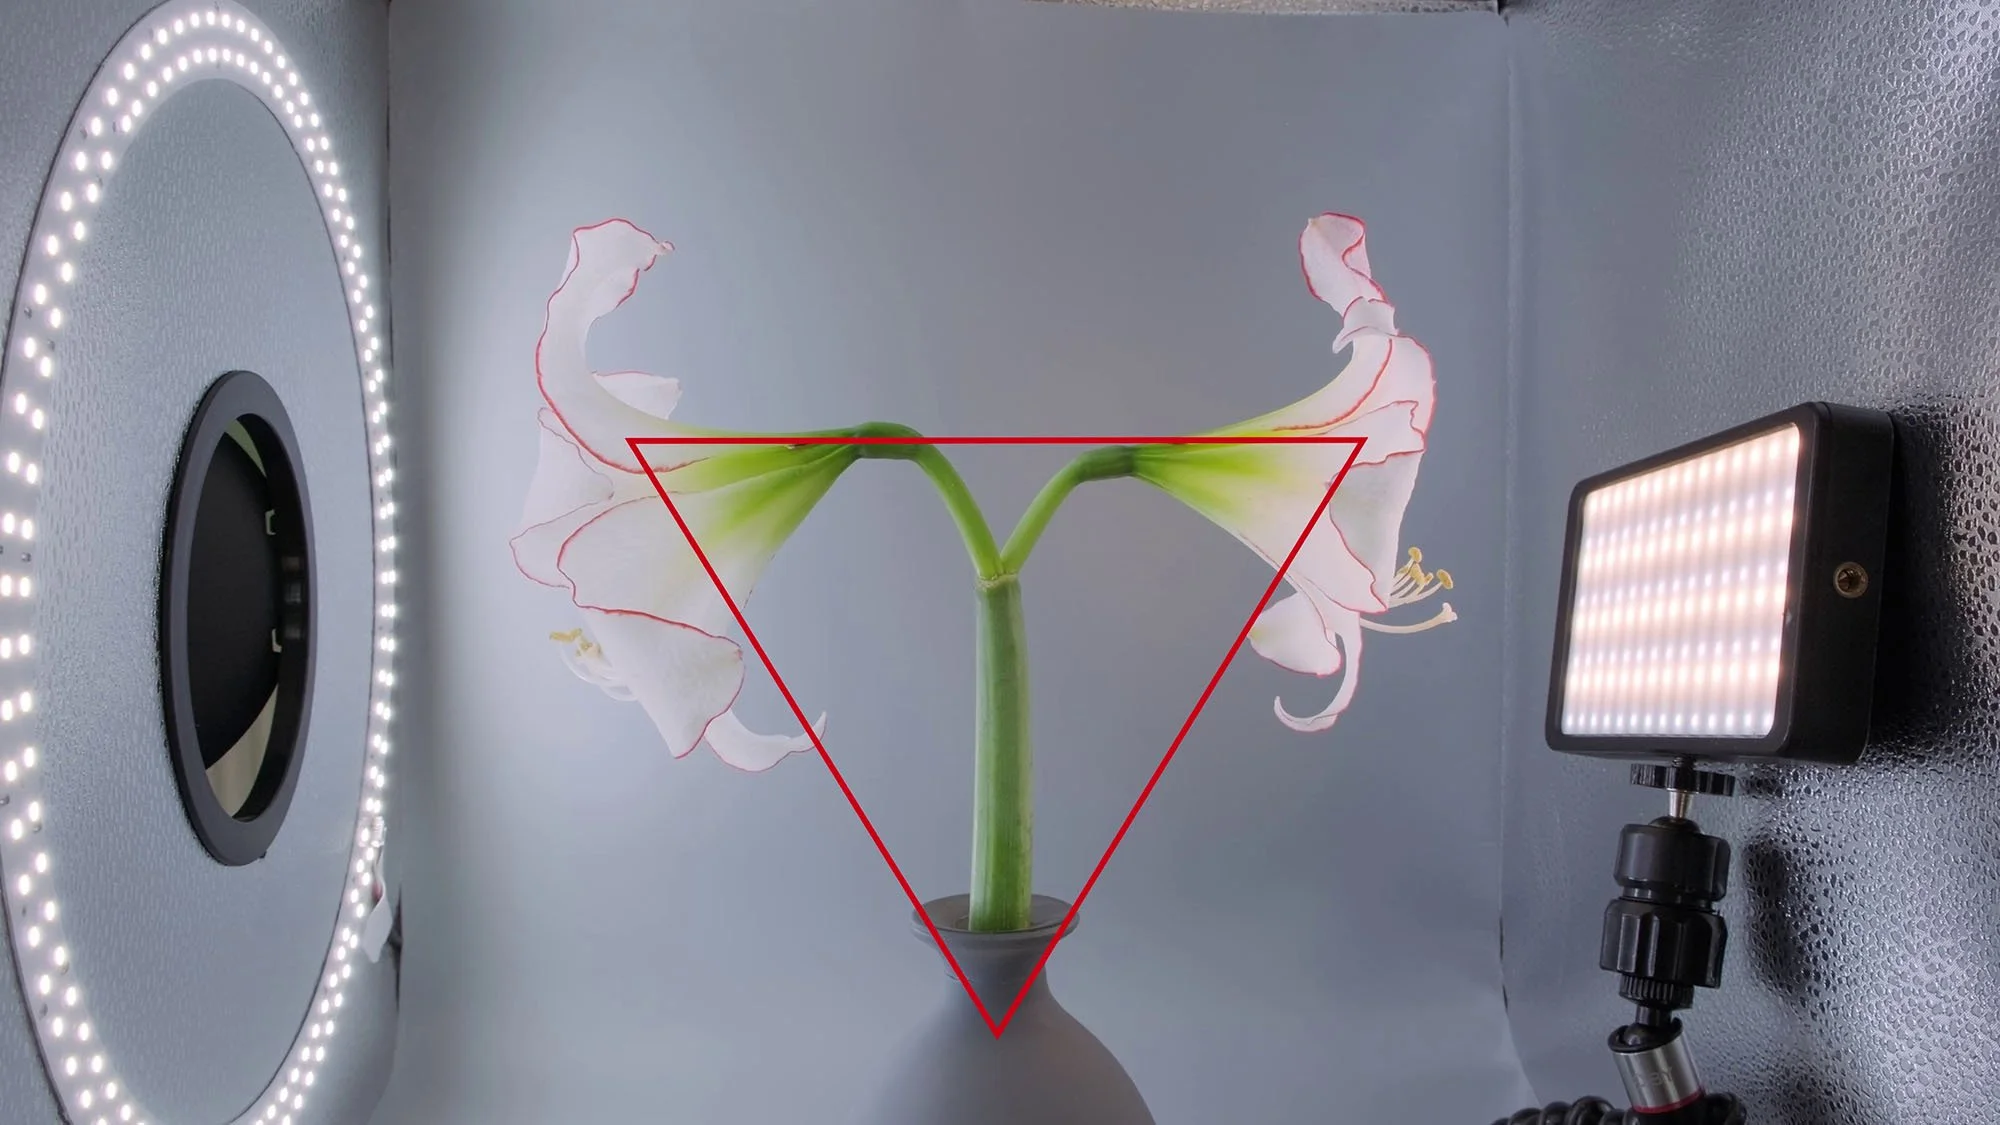
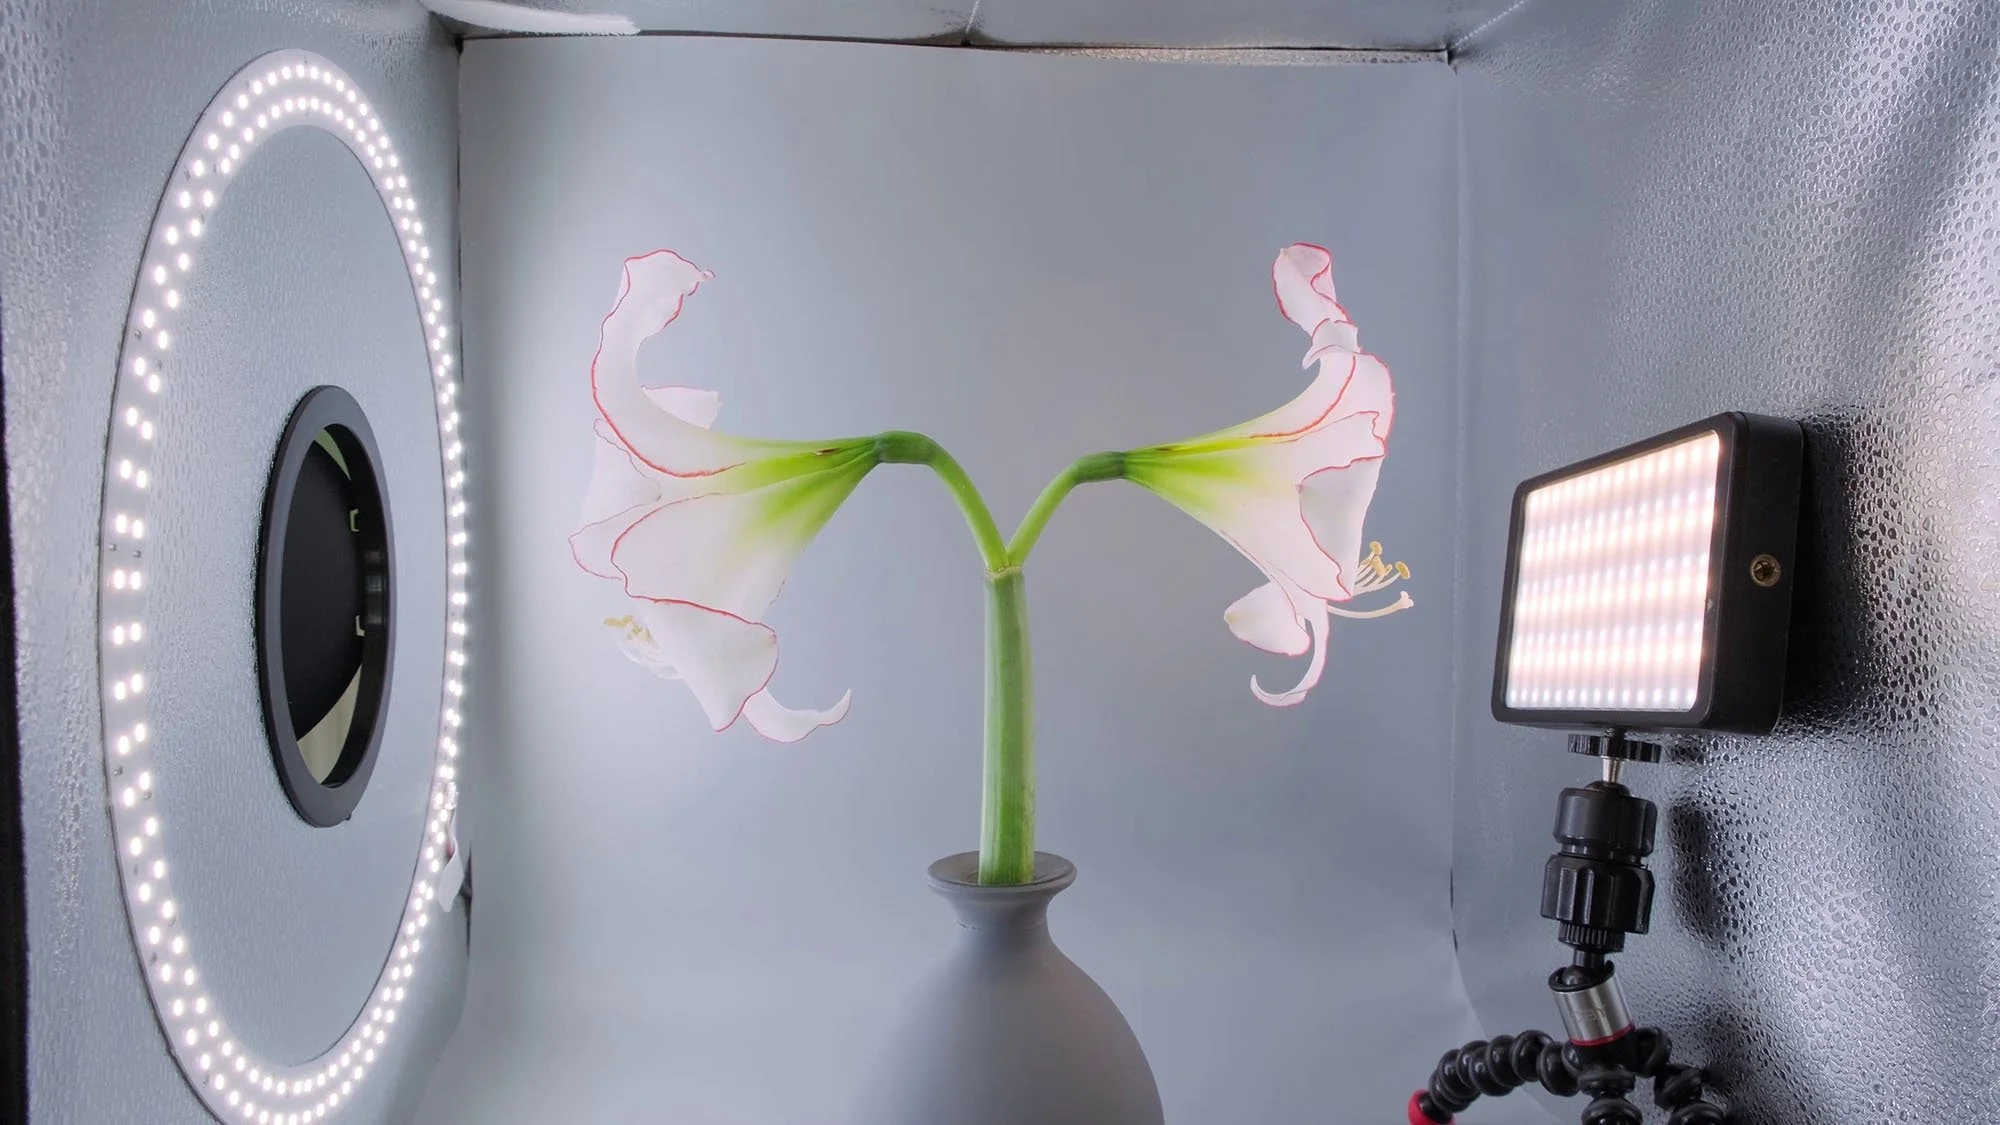
For this setup, we’re using a lightbox to control both the light and background. Still life photography often features classic objects like flowers, vases, books, and fruit — arranged with care to evoke the look of traditional paintings. The goal is to move from documenting an object to creating an image that feels like art.

Here, a 55mm lens replaces the macro lens usually used for close-up flower shots. This allows you to step back, capturing not just the flower but also the vase and table it rests on. The result is a more balanced, composed image ready for artistic editing later.


Setting Up Your Composition
Start by setting a neutral background, such as grey card. This keeps the setup simple and ensures you can easily add textures in post-production. Then, take time to carefully balance your composition — the relationship between the flower, vase, and negative space matters.
In this setup, a double-headed flower was arranged to form an inverted triangle, a classic compositional shape that gives the image structure and visual strength. Longer stems can look awkward in smaller vases, so trim and adjust until the arrangement feels proportionate.
Tip: Before shooting, sketch or visualise your composition. Thinking about balance and shape will help your still life feel intentional rather than improvised.
If you enjoy arranging objects and working with composition, try our Flat Lay Photography Tutorial
Get access to ALL our online courses - 1000’s of videos, worksheets, critiques of students work, personalised support and much more with our monthly membership.
Mastering the Lighting
Lighting is the defining element of any still life. For this shoot, the lightbox was rotated 90°, so the built-in top light now came from the side — perfect for directional light that gives form and depth.
Here’s the lighting setup:
Main light: Lightbox panel from the left
Fill light: An LED panel placed on the opposite side to soften shadows
Accent light: A torch added from the side during a 10-second exposure for subtle highlights
Settings: 1/125 sec, f/8, ISO 400
After balancing the lighting temperature and reducing the LED’s warmth, the flower appeared naturally illuminated without harsh contrast.

Tip: Don’t rely on just one light source. Experiment with handheld lights, reflectors, or torches to sculpt your subject.
The lighting and setup techniques used here are also perfect for product photography — check out our Product Photography Tutorial for more tips.
Refining the Details
Attention to detail can make or break your still life.
Hide imperfections
Trim any dead leaves
Fine tune the LED light temperature for natural colour balance
Multiple shots were taken at different apertures (f/8–f/11) to ensure sharp focus throughout the frame. These small steps ensure that when you move into editing, you start with the cleanest, most balanced image possible.
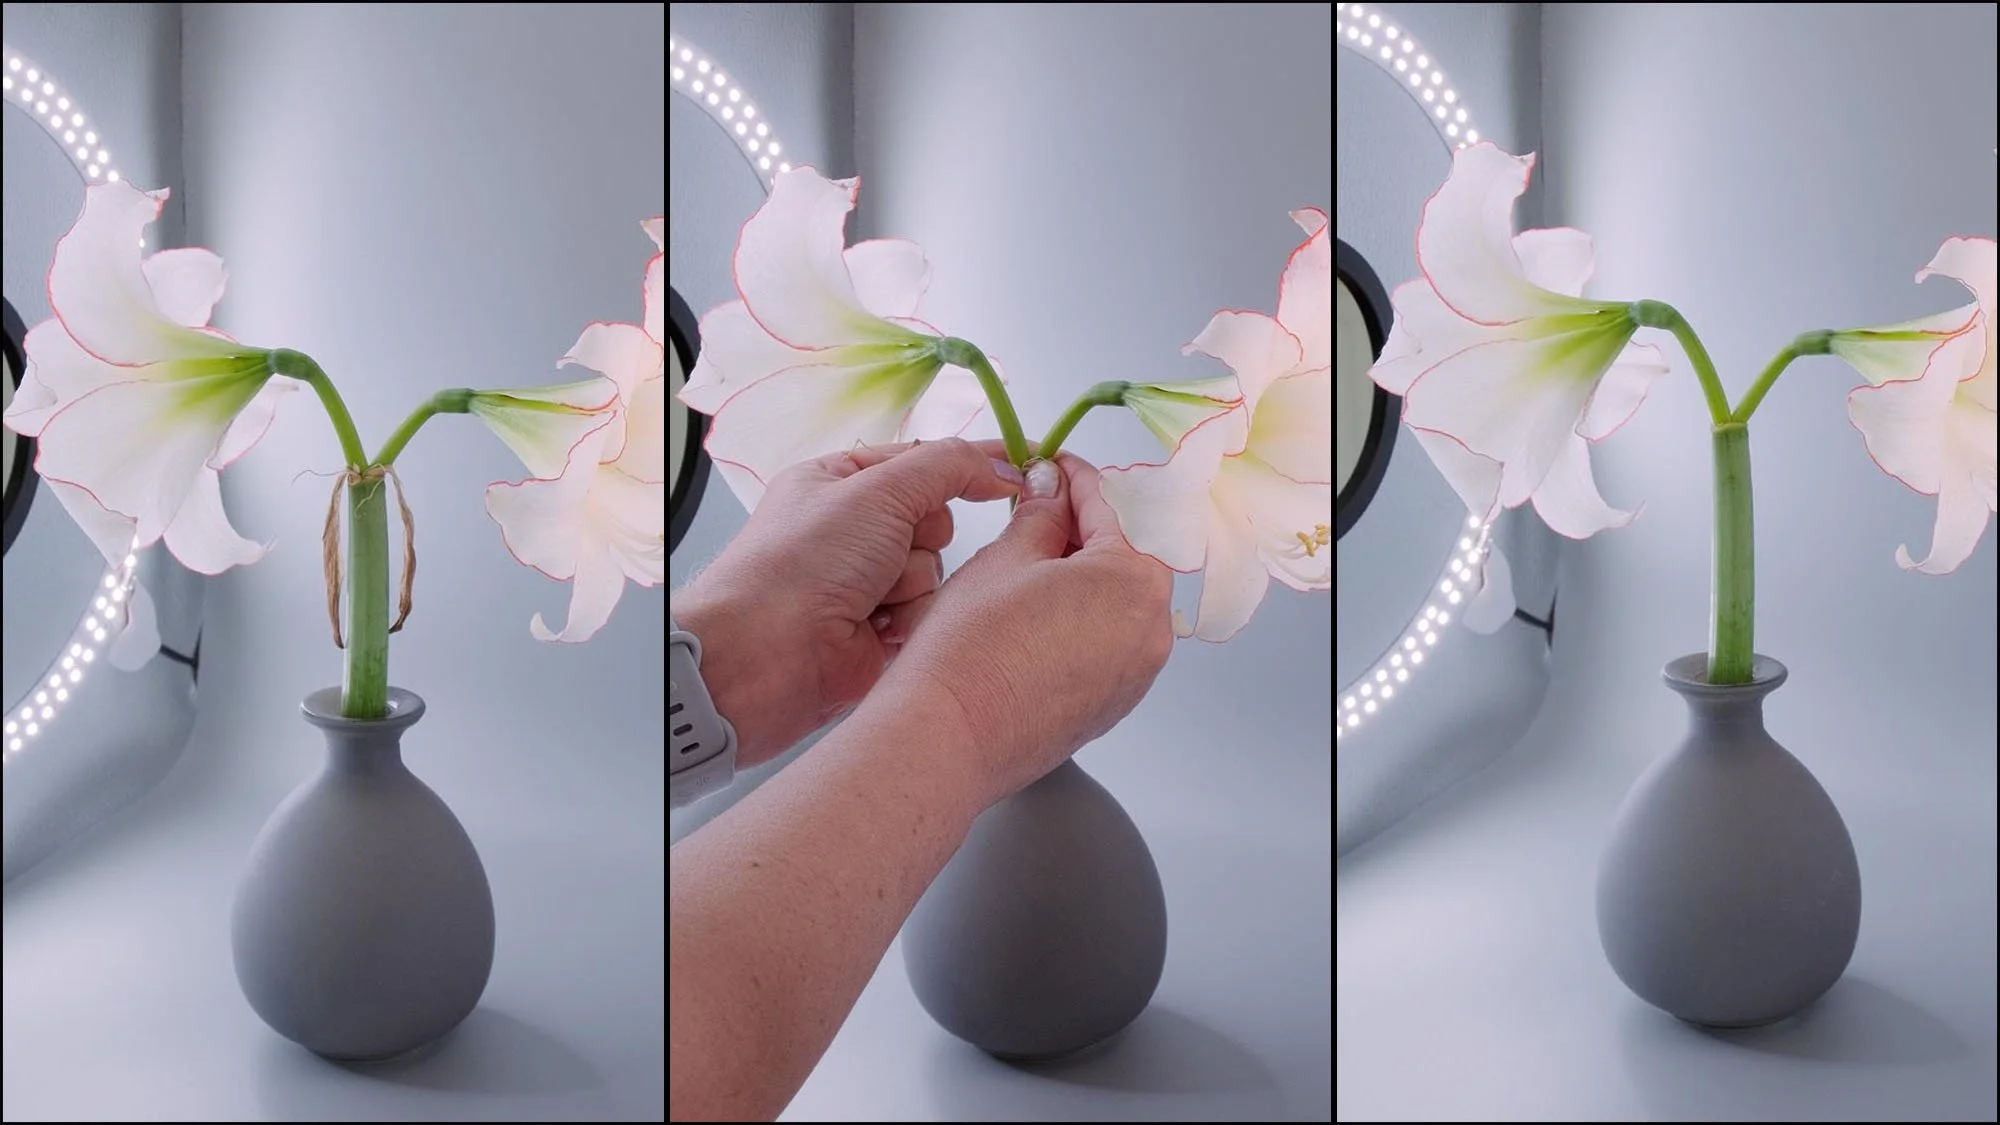
Trimming process
Once you’ve captured your still life shots, you can enhance textures and tones using post processing techniques.

Before Edit

After edit
Download this Raw file and learn how to create this exact edit in our Flower Photography Course.
Smaller Setup with Overhead Light
Now you have mastered the first setup, it’s time to experiment. The next composition uses a tiny pottery vase with a magnolia flower, this time lit from above instead of the side. This produces a more classic, softly lit feel.
Camera settings for this setup:
Aperture: f/7–f/10
Shutter speed: 1/160–1/250 sec
ISO: 400
The same grey background was used to maintain consistency, with lighting softened for a calm, delicate mood. Even minor distractions — like a small beetle on a petal — were considered and either removed or planned for editing later.

Wrapping Up: Experiment and Refine
Once your still life is set up, don’t stop at one shot. Try different flowers, swap vases, and explore new lighting angles. The beauty of still life photography lies in its flexibility — you control every element of the frame.
When you find a composition that works, experiment with post-processing. Add textures, convert to black and white, or enhance tones for a painterly finish.
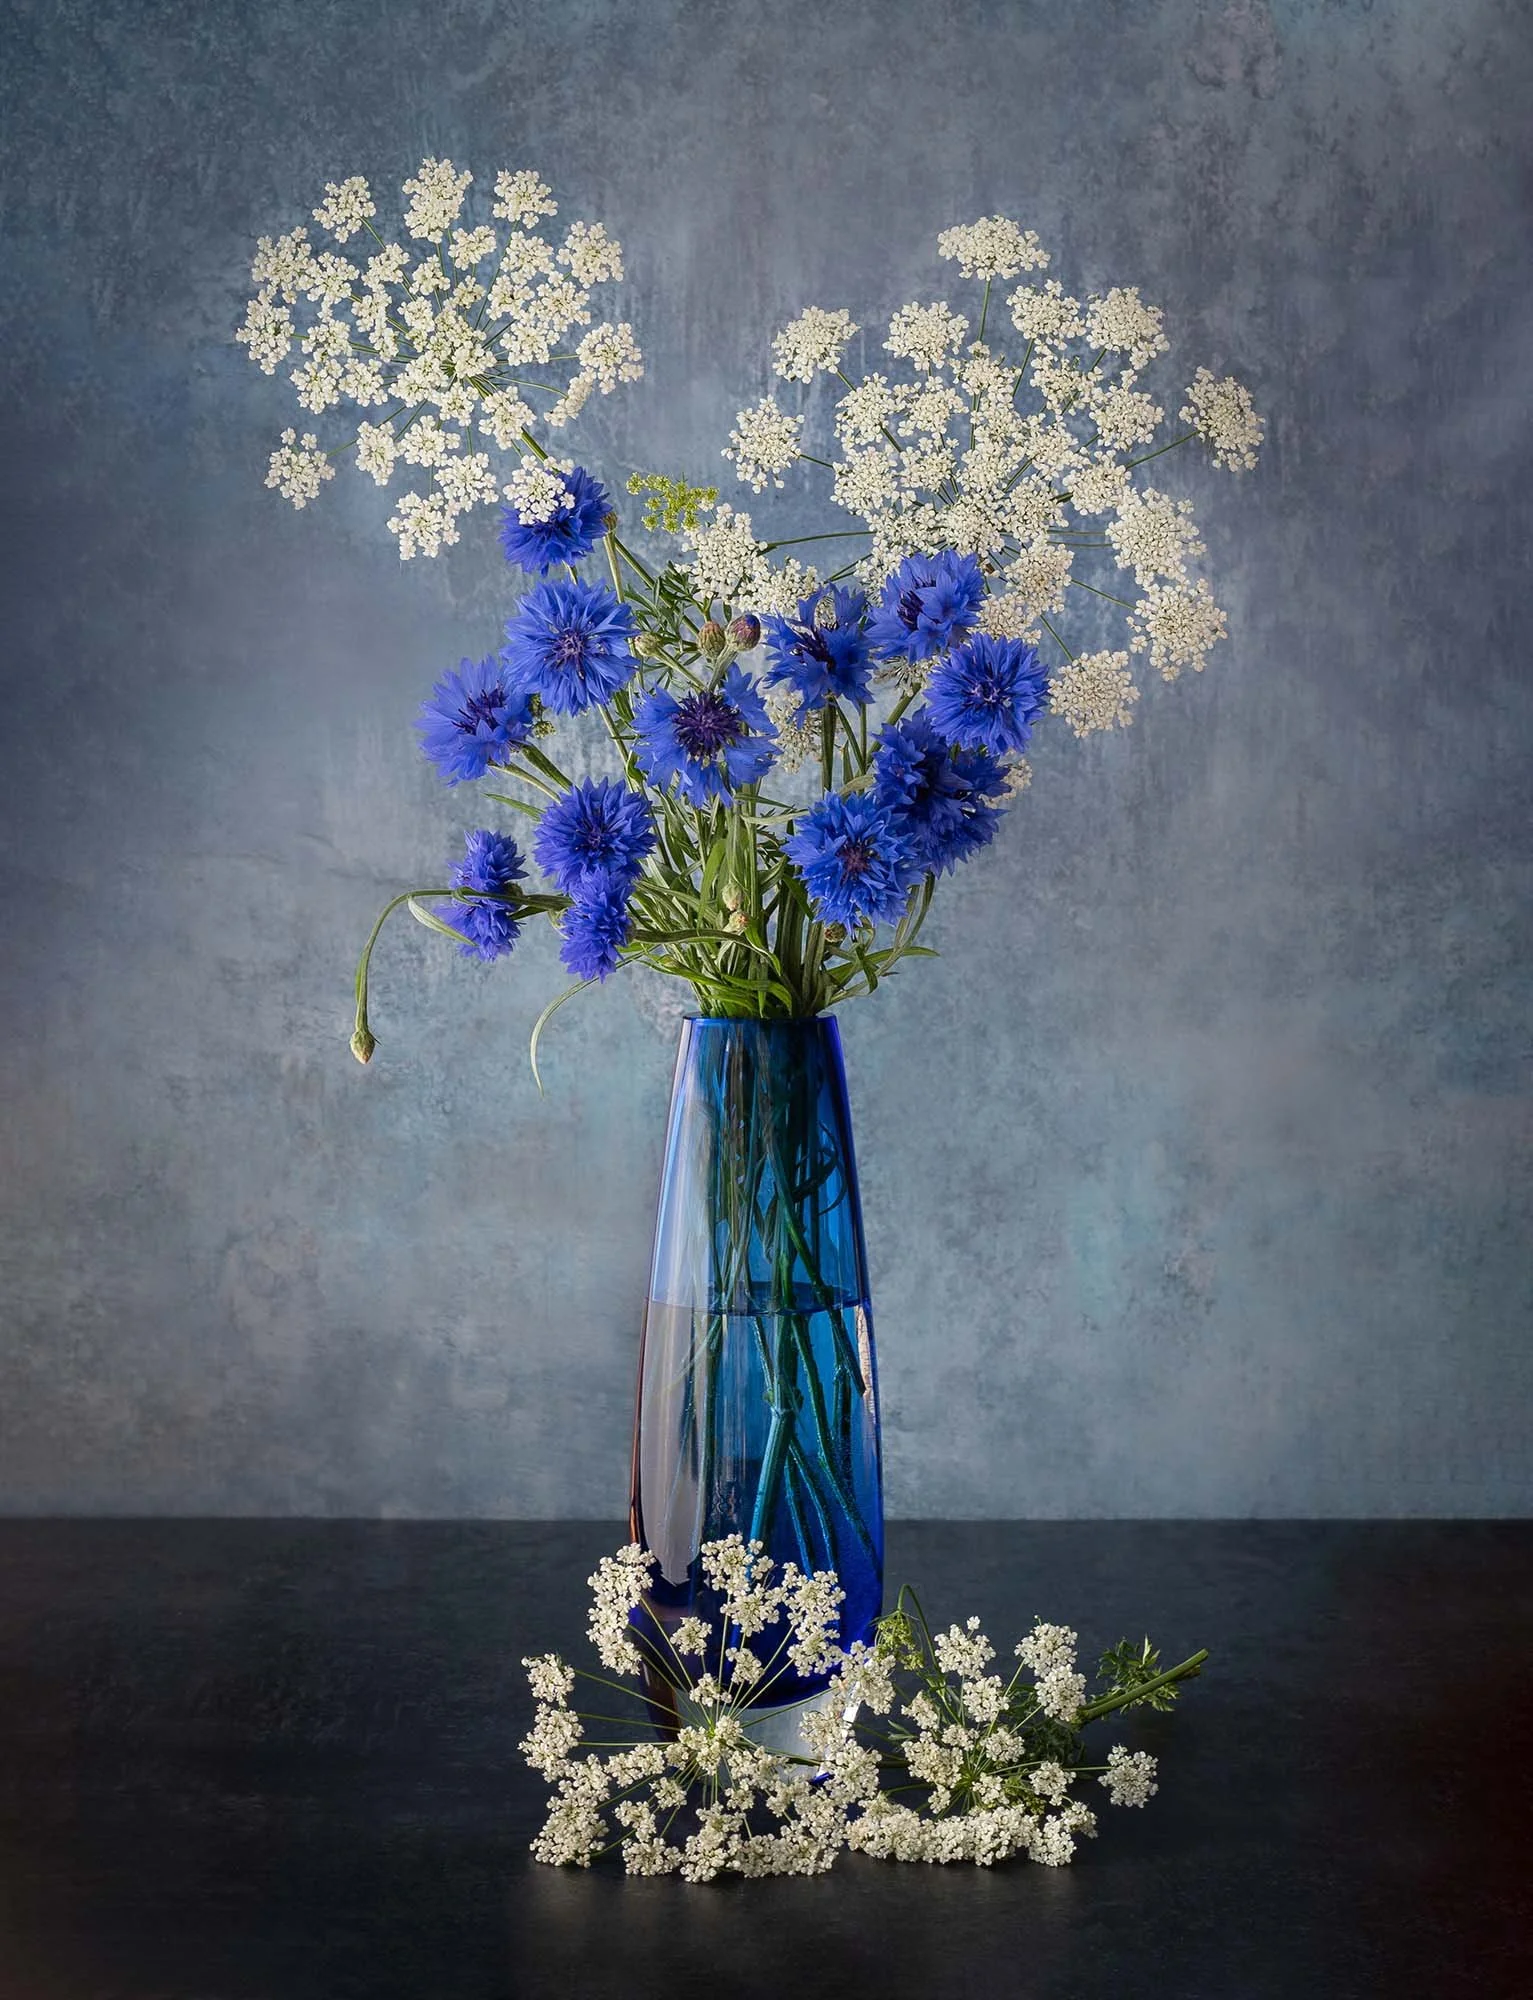
© Molly Hollman

© Molly Hollman

© Molly Hollman
Check out our new course Flower Photography Course coming soon
Challenge: Create your own still life flower photo at home. Focus on balance, subtle lighting, and creative editing — and tag us on social media with your results!
Conclusion
Still life flower photography is one of the most rewarding ways to develop your eye for detail and composition. It slows you down and encourages you to think about every aspect of the image — from how the petals curve to how light falls across the vase. By experimenting with lighting direction, aperture, and arrangement, you’ll soon start to see how subtle changes can transform a simple setup into something extraordinary.
Whether you’re shooting in a lightbox or by a window, the goal is the same: to create images that feel timeless and intentional. Don’t be afraid to play with textures, try new lighting angles, or edit your shots with a fine-art finish. The more you explore, the more you’ll refine your creative voice.
Like this? - Check out more free tutorials below


I hope you liked this tutorial on Still Life Flower Photography. If you did, please leave us a comment and support us by sharing it with your friends and subscribe to our newsletter at the bottom of this page for more.
We also have an excellent learning community on social media so please join us there as well.
Thanks for watching and remember – Learn more at The School of Photography.