Lightroom vs Photoshop: What’s the Best Choice for Photo Editing?
Why do photographers do most of their editing in Lightroom or Photoshop, and what makes them choose one over the other? Is Lightroom better than Photoshop for photography, or is Photoshop used for most photo edits?
In this guide, we’ll answer the Lightroom vs Photoshop question by comparing how each program is used for portrait and landscape photography. By looking at real-world editing examples, you’ll clearly see whether Photoshop or Lightroom is the best choice for your photography workflow.
If you want your photography to stack up against the best out there, choosing the right editing software matters. We’ll show you when to use Lightroom, when to use Photoshop, and when using both together makes sense.
So… Lightroom vs Photoshop – which one should you use? Let’s find out.
Get access to ALL our online courses - 1000’s of videos, worksheets, critiques of members work, personalised support and much more with our monthly membership.
Lightroom vs Photoshop: What’s the Difference?
Lightroom
Lightroom is designed to help photographers organise, manage, and edit large volumes of photos efficiently. You can import, organise, process, and export batches of images all at once, making Lightroom ideal for high-volume photography workflows such as weddings, portraits, and landscapes. It is built to work hand in hand with Photoshop, not replace it.
Lightroom is especially powerful when working with RAW files, allowing photographers to make precise exposure, colour, and tonal adjustments while maintaining maximum image quality. However, Lightroom is not a photo manipulation tool like Photoshop and does not include the advanced retouching, compositing, or pixel-level editing features required for heavy edits on single images.
One of Lightroom’s biggest advantages is its non-destructive editing workflow. This means your original photo is never overwritten. Instead, all edits are stored in a separate XMP sidecar file (Extensible Metadata Platform), which sits alongside the original image and records every adjustment you make. This allows you to re-edit, undo, or change your edits at any time without degrading image quality.
There are two versions of Lightroom available to photographers: Lightroom Classic and Lightroom CC, each designed for different editing workflows and storage preferences.
Lightroom Classic: Features, Benefits & Best Uses
This is the more powerful of the two and the one most people use. It’s designed for use on a desktop computer.

Studio portrait edited in Lightroom, showing global adjustments to colour, contrast and tone before exporting to Photoshop for retouching.
Lightroom CC
Lightroom CC is Adobe’s cloud-based version of Lightroom, designed for photographers who want to edit across mobile devices, tablets, and desktops. Often referred to as the mobile version of Lightroom, it works like an app and is ideal for photographers who need flexibility and on-the-go editing.
Compared to Lightroom Classic, Lightroom CC is a scaled-down version with a simplified interface and fewer advanced organisational tools. Instead of storing images locally on your computer, photos are stored in the Adobe cloud, allowing you to access and edit your images from multiple devices.
Lightroom CC is best suited to photographers who prioritise convenience, portability, and quick edits, rather than complex file management or large-scale professional workflows.

Lightroom CC Logo
Photoshop: Features, Benefits & Best Uses
Photoshop is a powerful digital image manipulation program designed for advanced photo editing and detailed adjustments that aren’t possible in Lightroom. It’s commonly used for heavier edits, such as replacing skies, removing unwanted objects, compositing images, and retouching skin at a pixel level.
One of Adobe’s taglines for Photoshop is “Go wherever your imagination takes you”—and that’s accurate. If you can imagine an edit, Photoshop gives you the tools to create it, making it the industry standard for creative and professional image manipulation.
Unlike Lightroom, which is built for batch editing, Photoshop is typically used to work on one image at a time. This makes it ideal for precision editing and complex retouching, but less efficient for high-volume workflows. In comparison, Lightroom allows photographers to apply edits to multiple images at once, making it faster for managing and editing large photo collections.

Final landscape image edited in Photoshop, with object removal, softened horizon and creative colour grading applied after Lightroom edits.
Using Lightroom and Photoshop Together
In most photography workflows, you’ll process your images in Lightroom first, making global adjustments such as exposure, tone, contrast, colour, and white balance. Once your images are refined, you can then export individual photos into Photoshop for more advanced manipulation.
Photoshop is used for edits that go beyond basic photo adjustments, such as removing or adding objects, replacing skies, advanced retouching, and compositing. This makes the combination of Lightroom and Photoshop incredibly powerful for professional photo editing.
Lightroom and Photoshop are designed to work hand in hand, allowing you to move back and forth between the two programs while maintaining image quality and editing flexibility. As I often tell my students: “Lightroom enhances the truth, and Photoshop tells the lie.”
If you want to learn how to use Lightroom or Photoshop in depth, including when to use each one and how to combine them effectively, visit here to explore our photography editing tutorials.
Lightroom vs Photoshop for Portrait Photography
Image 1 shows the RAW file of a studio portrait. This is the photo straight out of the camera, with no edits applied.
Image 2 shows the same portrait after Lightroom editing. At this stage, I made global adjustments to the image, including changes to contrast, colour, and saturation. In many cases, photographers will stop here, as Lightroom edits alone are often enough for professional-looking results.
However, in this example, I wanted to take the portrait further. Ideally, a reflector should have been used to bounce light back into the subject’s face, so I exported the image into Photoshop for more precise finishing touches.
Image 3 shows the final Photoshop edit. Here, I carried out detailed retouching, including smoothing skin, brightening the eyes, removing distracting elements from the dress, toning down the background lamp, and applying subtle colour grading to bring the image into better visual harmony.
While all of these edits could have been done in Photoshop alone, I would have lost the efficiency of Lightroom’s organisation and batch editing tools. By using Lightroom for organising the shoot and applying global edits, and Photoshop for fine, detailed retouching, I achieved a more professional result while keeping an efficient editing workflow—especially useful when working with multiple images from the same shoot.

Original RAW portrait image straight out of the camera, before any Lightroom or Photoshop edits.

Portrait edited in Lightroom showing global adjustments to colour, contrast and tone before exporting to Photoshop.
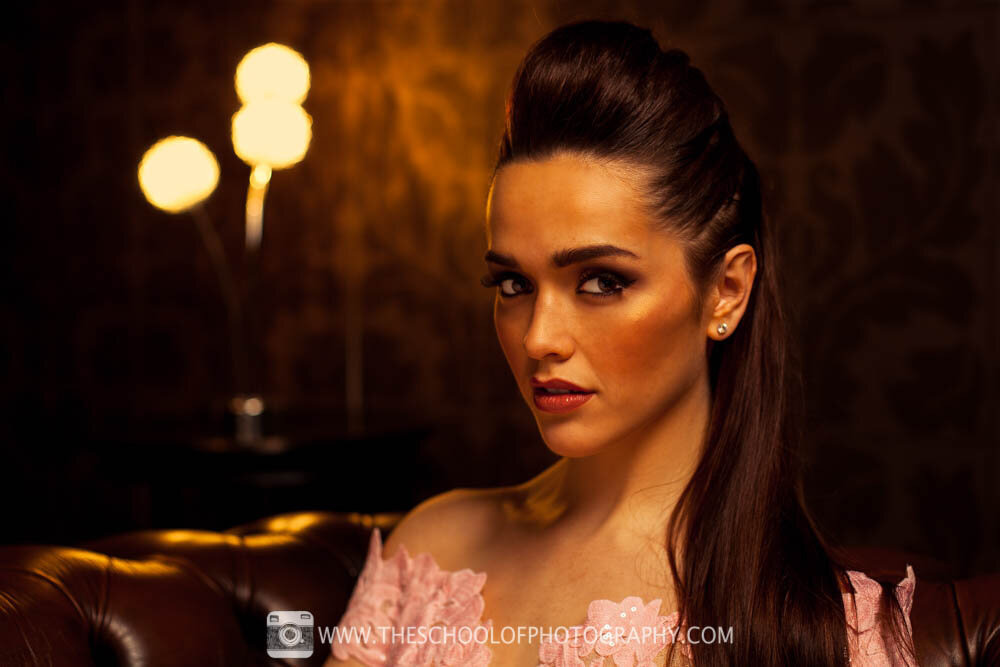
Final portrait example showing how Lightroom and Photoshop are used together to create a polished, professional image.
To learn how to take studio portraits, click here.
Lightroom vs Photoshop for Landscape Photography
Image 1 shows a long-exposure landscape photograph in RAW format, straight out of the camera with no edits applied. As is common with RAW landscape photography, the image appears flat and dull at this stage, as no contrast, colour, or tonal adjustments have been applied yet.
Image 2 shows the same landscape after Lightroom editing. Here, I made global adjustments by cropping the image, enhancing the colours, increasing contrast, and slightly brightening the exposure. For many photographers, these Lightroom edits would be more than sufficient. However, I wanted to create a more surreal and atmospheric look, so I exported the image into Photoshop for further refinement.
Image 3 shows the final Photoshop edit. At this stage, I removed the distracting jetty on the right-hand side, softened the horizon line, and applied creative colour grading to increase the vibrancy and overall mood of the photograph.
Although all of these edits could have been completed in Photoshop alone, doing so would have removed the efficiency of Lightroom’s image organisation and batch editing capabilities. By using Lightroom for organising the shoot and applying global edits, and Photoshop for detailed, creative adjustments, I was able to maintain an efficient workflow while achieving a more polished final image.

Original RAW landscape photograph straight out of the camera, before any Lightroom or Photoshop edits.

Landscape photograph edited in Lightroom, showing global adjustments to colour, contrast and exposure before exporting to Photoshop.

Final landscape example showing how Lightroom and Photoshop are used together to create a polished, professional image.
Lightroom vs Photoshop: Final Thoughts
These examples clearly show why the Lightroom vs Photoshop debate doesn’t always have a simple answer. In many cases, using both Lightroom and Photoshop together is the best approach—especially if you want your photography to truly stand out.
That said, for a large number of photographers, learning Lightroom alone is often more than enough. Lightroom excels at organising images, editing quickly, and processing RAW files, and it includes all the essential tools needed to turn unedited photos into polished, professional results.
For a more detailed breakdown of how these images were edited in Lightroom and Photoshop, watch the video above, where the full editing workflow is explained step by step.
Like this? - Check out similar tutorials below


I hope you enjoyed our lightroom vs Photoshop comparison, if you did please leave us a comment and support us by sharing it with your friends and subscribe to our newsletter at the bottom of this page for more.
We also have an excellent learning community on social media so please join us there as well.
Thanks for watching and remember – Learn more at The School of Photography.

Marc Newton